Fix System thread exception not handled boot loop. The system thread exception not handled error usually indicates that a system thread generated an exception that the error handler did not catch. The exceptions are various, but what is certain is that this error is usually caused by incompatible drivers, system incompatibility, memory conflicts, IRQ conflicts, etc. In this article, Theartcult will share with you how to fix this error.
Fix System thread exception not handled boot loop
Create installation media through Download Windows 10
Reboot your computer.
Now after the restart of the operating system it will go directly to the bootable disk .
Note: it might ask you to choose if you want to boot from the specific Windows 10 media and you will need to do so.
Method 1:
- Insert the Windows 10 DVD/USB
- Left click or tap on the “Next” button situated in the lower side of the screen.
- Now you will need to left click or tap on the “Repair your computer” feature situated in the lower side of the screen.
- In the “Choose an option” window you will need to left click or tap on the “Troubleshoot” feature.
- In the next window you will need to left click or tap on the “Advanced options” feature.
- Now left click or tap on the “Command Prompt” feature.
- When the “Command prompt” window (black box) is in front of you write in there the following: “C:” but without the quotes.
- Press the “Enter” button on the keyboard.
- Write in the command prompt window the following command: “BCDEDIT /SET {DEFAULT} BOOTMENUPOLICY LEGACY” without the quotes.
- Press the “Enter” button on the keyboard.
- Now if you have written correctly the command above you will need to write: “Exit” without the quotes.
- Press the “Enter” button on the keyboard in order to exit the command prompt window.
- Now in the “Choose an option” window you will need to Left click or tap on the “Continue”.
- Reboot your Windows 10 computer.
Method 2:
- Restart the computer
- Press on the “F8” button on the keyboard continuously until you get to the “Advanced boot options” menu.
- In the “Advanced boot options” window you will need to move with the arrows on the keyboard and select the “Safe Mode” feature.
- Press the “Enter” button on the keyboard.
- Now that your Windows 8.1 or Windows 10 starts you will need to log on with the administrator account.
- Left click or tap on the “Desktop” icon in the start screen.
- Move the mouse cursor over to the lower right side of the screen.
- From the menu that appears you need to left click on the “Settings” feature.
- In the “Settings” menu you will need to left click or tap on the “Control Panel” icon.
- Now in the “Control Panel” window you need to left click or tap on “Device Manager”
- In the “Device Manager” menu on the left side double click (left click) on the “Display adapters” category in order to expand it.
- Now you will have there the graphics driver that you currently use in Windows 10 and you need to right click on it.
- Left click on the “Uninstall” option.
- Left click or tap on the “OK” button on the next window that appears in order to confirm the uninstall process.
Now after the driver is uninstalled you need to take out the Windows 10 boot media and also restart your operating system.
After the operating system powers up again follow the steps above to check if it installed the graphics driver automatically.
Note: if it wasn’t installed automatically you will need to go on the manufacturer’s website and download the latest driver for your graphics card from there (be sure that the driver is compatible with your Windows 10 device).
Install the latest driver available and reboot the system again.
Method 3: Check in compatibility mode.
Download the drivers from manufacture’s website for Windows 10, if there no drivers available for Windows 10, download the latest driver from the manufacturer’s website and try installing it in compatibility mode. Compatibility mode runs the program using settings from a previous version of Windows.
Follow these steps to install the drivers in compatibility mode and check if that helps.
a. Download the driver from the manufacturer’s website.
b. Right-click on the driver setup file and click on ‘properties’.
c. Click on the ‘compatibility’ tab and check the box ‘Run this program in compatibility mode for’ and select Windows 8 operating system from the drop down menu and proceed with the installation.
d. Once this is done, restart the computer and check if the issue persists.
You may also refer: Make older programs compatible with this version of Windows (Steps applies to Windows 10)
Fix System thread exception not handled BSOD Error Windows 10
This is how to fix WppRecorder.sys System Thread Exception not handled BSOD Error Windows 10 –
1] Disable NTFS compression
The problem is mainly caused by the task performed by the CBS scavenging process. And the Cdrom.sys compression SSU ends up with a BSOD, so disabling NTFS compression might fix the hypothetical error. Follow the same steps –
- Click the icon or the Search box on the taskbar, type, advanced startup and press – Enter .
- Select – Restart now .
- Select – Troubleshoot on the next screen.
- Next, click – Advanced options .
- Select – Command prompt .
- Copy the following command, paste and press Enter –
c:windowssystem32compact.exe /U c:windowssystem32drivers*.sys
- Restart the computer and enter the command below, then press Enter –
fsutil behavior set DisableCompression 1
- This will disable NTFS compression system-wide so CBS Scavenger may not cause further problems.
- Again restart your PC to implement the DisableCompression setting.
Now, the files will continue to be compressed but CBS Scavenger will no longer compress the file and result in a blue screen error.
2] Install Windows Update
Microsoft is always careful about problems that occur on Windows, and once they know, send a team to find a solution. Cumulative or optional further updates bring these fixes to the operating system and this can happen with the error WppRecorder.sys System Thread Exception not Handled Blue screen. Therefore, install recent patches using the following guidelines:
- Click Search on the taskbar, type updates and then press – Enter .
- Select – Check for updates .
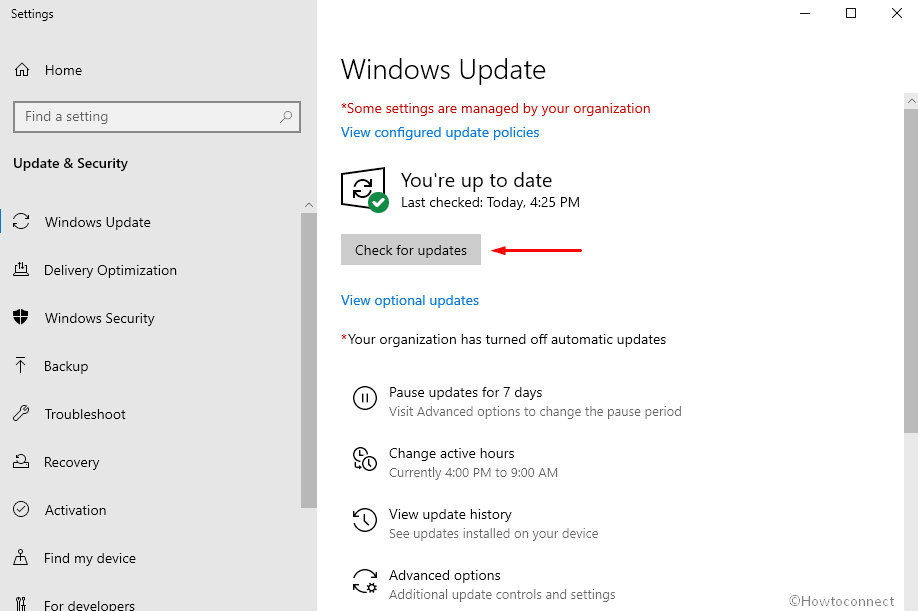
- Allow the download to complete successfully, and once finished, click Install now.
Video How to Fix the System Thread Exception Not Handled Error in Windows 10?
If you have some problem with system thread exception errors, this video will help you a lot.