How to convert 2D images to 3D in Photoshop. Let’s learn how to create 3D images in Photoshop with Theartcult.net! Photoshop can create a series of basic 3D shapes using 2D layers as a starting point. After creating the 3D object, you can move it into 3D space, change the render configuration, add lighting or merge it with other 3D layers.

How to convert 2D images to 3D in Photoshop
- Convert 2D layer to 3D postcard. If you start the layer with a text, the transparency will be preserved.
- Wrap a 2D layer around a 3D object such as a cone, cube, or cylinder.
- Create a 3D mesh from grayscale in a 2D image.
- Simulates a metalworking technique called repoussé by casting a 2D object in 3D.
- Build a 3D solid from a multiframe file such as a DICOM medical image file. Photoshop combines each piece of the file into a 3D object. You can manipulate it in three dimensions and see any angle you want. You can apply various 3D rendering effects to optimize the rendering of materials when scanning, such as bone or soft tissue.
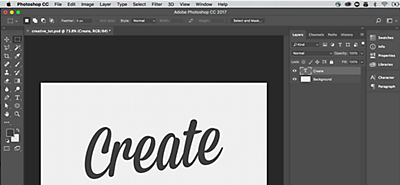
1. Create a new file with the text you’d like to turn into a 3D image.
You can choose any font and size.
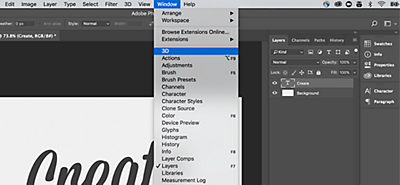
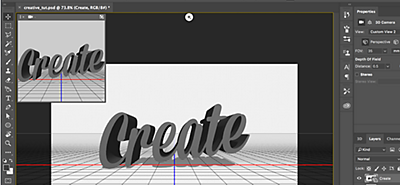
2. Now, turn it into a 3D object.
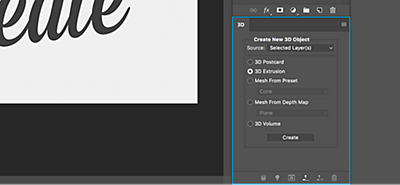
Click on Window in the main menu, select 3D, and a dialog box will open. This allows you to take any layer and turn it into 3D. Your design can be a flat plane—or it can be extruded, turned into a mesh or a basic shape. For this example, we’re going to extrude the text “Create.”
Click Create (the menu option) and the 3D tab will appear like a new Layers panel.
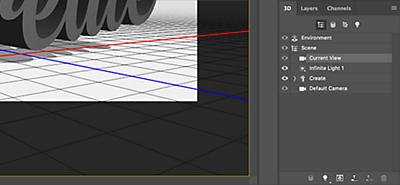
3. Change the camera angle.
Select the text, place your cursor over it, and move the mouse—the text will rotate with the mouse. Select Current View and the same action will change the camera angle.
4. Change the shadow.
Select Infinite Light 1 or the light source, and the same mouse action changes the shadow. You can show the light source by clicking View in the main menu, then Show and 3D Lights.
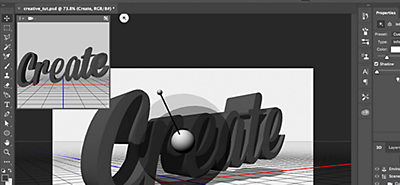
5. Change the light source and shadow angle.
Changing the location of the light source will change the direction of the shadow. You’ll see the source button above the canvas area in the top third of the frame. (In this image, it’s the white dot above the canvas area.)
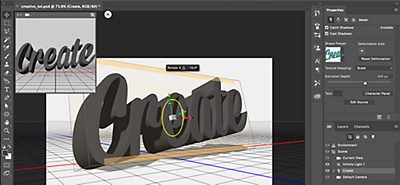
6. Change the image position.
You can move and roll over the 3D text by reselecting its layer (in this example, it’s named “Create”) and changing its position. The text will appear inside a 3D box as you’re moving it.
Create 3D postcards
Note: You can add a 3D postcard to an existing 3D scene to create a surface that shows shadows and reflections from other objects in the scene.
1. Open the 2D image and select the layer you want to convert to postcard.
2. Select 3D > New 3D Postcard From Layer.
- Convert the 2D layer to 3D in the Layers panel. 2D layer content as a material for both sides of the postcard.
- The original 2D layer appears in the Layers panel as a Diffuse texture map for a 3D postcard object.
- The 3D layer retains the size of the original 2D image.
3. To add a 3D postcard as the plane of the 3D scene, merge the new 3D layer with the existing 3D layer containing other 3D objects, and then align it as needed.
4. To keep the new 3D content, export the 3D layer as a 3D file or save it as a PSD.
Create 3D shapes
Depending on the type of object you select, the 3D model can contain one or more meshes. The Spherical Panorama option maps the panorama into a 3D sphere.
1. Open the 2D image and select the layer you want to convert to 3D.
2. Choose 3D > New Shape From Layer, and choose a shape from the menu. Shapes include single mesh objects such as donuts, spheres, hats, and many other mesh objects such as cones, cubes, cylinders, soda cans, or wine bottles.
Note: You can add custom shapes to the Shape menu. Shapes are Collada 3D model files (.dae). To add a shape, place the file in Presets\Meshes inside Photoshop’s folder.
- Convert the 2D layer to 3D in the Layers panel.
- The original 2D layer shows up in the Layers panel as a Diffuse Texture map. It can be used on one or more 3D object surfaces. Other surfaces can be attached to the Diffuse Texture map with default color settings.
3. Use the Spherical Panorama option if using the panorama as a 2D input. This option converts a 360-degree image into a 3D layer. Once the conversion to a 3D object is complete, you can paint over hard-to-reach panoramic areas such as poles or areas with straight lines.
4. Export the 3D layer as a 3D file or save it as a PSD to keep the new 3D content.
Create a 3D mesh object (3D Mesh)
The New Mesh from the Grayscale command converts a grayscale image into a depth map that translates luminance values into surfaces of varying depth. Lower values create raised areas on the surface, higher values create lower areas. Photoshop then applies a depth map to one of four possible geometries to create a 3D model.
1. Open a 2D image and select one or more layers you want to convert to 3D mesh.
2. (Optional) Convert the image to Grayscale mode (Image > Mode > Grayscale or Image > Adjustments > Black & White to adjust the grayscale conversion).
Note: If the RGB image is imported when creating the Mesh, the blue channel is used to create the depth map.
3. (Optional) Edit the Grayscale image as needed to limit the brightness value.
4. Select 3D > New Mesh From Grayscale, and then select a desired Mesh.
- Plane: Apply depth-mapped data to a flat surface.
- Two-Sided Plane: Creates two reflection planes along the central axis and applies a Depth Map to both planes.
- Cylinder: Apply a Depth Map off the center of the vertical axis.
- Sphere: Apply Depth Map data beyond the center point
Photoshop creates a 3D layer containing a new Mesh. It also creates Diffuse, Opacity and Planar Depth Map texture maps for 3D objects, using Grayscale or original color layers.
You can reopen the Planar Depth Map as a Smart Object at any time and edit it. When saved, the Mesh will be regenerated.
Note:
The Opacity texture map does not appear in the Layers panel, because that map uses the same texture file as the Diffuse map (the original 2D layer). When two structure maps reference the same file, the file appears only once in the Layers panel.
Create 3D animations
Using the Photoshop Animation timeline, you can create 3D animations in space and change its appearance over time. You can animate any of the following properties of the 3D layer:
- 3D object or camera position: Use 3D position or camera tools to move the 3D model or camera over time. Photoshop can morph frames between camera positions or movements to create smooth animations.
- 3D rendering settings: Change render modes, with the ability to morph between several render modes. For example, change the Vertices mode gradually to Wireframe over time, to simulate sketching the model structure.
- 3D section: Rotate an intersecting section to show a time-varying section. Change cross-section settings between frames to highlight different modeling areas.
For high quality animation, you can render each animation frame by frame using Render for the Final Output render setting.
Combining 3D objects
Merge 3D layers allows you to combine multiple 3D models into a single scene. Once combined, each 3D model can be edited individually, or you can use position and camera tools on all models at once.

- Open 2 document windows, each containing a 3D layer.
- Create the source material (the file you are copying the 3D layer from).
Select the 3D layer in the Layers panel and drag it to the target document’s window (this file will contain the combined 3D objects). The 3D layer is added as a new 3D layer in the target document. It becomes the active layer in that document’s Layers panel. - In the Tools panel, select the 3D camera tool.
- In the options bar, from the Position menu, select the layer name from the original 3D layer in the target file.
- After you match the camera positions of the 2 3D layers, the two 3D objects will appear together in the scene. Use the 3D correction tools to reposition objects before merging.
- From the options menu in the Layers panel, click Merge Down. 2 3D layers are combined into 1 3D layer. The origin of both are aligned.
Hope this article was useful to you!