This panel lets you undo several steps created in a project, in which tab can you access the preferences pop up window, what is the keyboard shortcut key to step forward in editing history, what is the keyboard shortcut key to undo a single step in photoshop, in which tab can you access the revert command, how to undo in photoshop, :
To perform multiple undo actions, stepping back through the history of your actions, you need to use the “Step Backwards” command instead. Click “Edit” and then “Step Backwards” or press “Shift” + “CTRL” + “Z,” or “shift” + “command” + “Z” on Mac, on your keyboard for each undo you want to perform
In case you change your mind or make a mistake, Premiere Pro provides several ways to undo your work. You can undo only those actions that alter the video program; for example, you can undo an edit, but you cannot undo scrolling in a window.
-
Do one of the following:
-
To undo the most recent change, choose Edit > Undo. (You can sequentially undo as many as 32 recent changes made to the project in any Premiere Pro panel.)
-
To jump to a specific state of the project since the project was opened, select an item in the History panel.
-
To undo all changes made since the last time you saved the project, choose File > Revert.
-
To undo changes made before the last time you saved a project, try opening a previous version of your project in the Premiere Auto-Save folder, and then choose File > Save As to store the project in a location outside the Premiere Auto-Save folder. The number of previous versions saved depends on the Auto Save preference settings.
-
To stop a change that Premiere Pro is processing (for example, when you see a progress bar), press Esc.
-
To close a dialog box without applying changes, click Cancel.
-
To set all values in an applied effect back to the default values, click the Reset button for the effect in the Effect Controls panel.
-
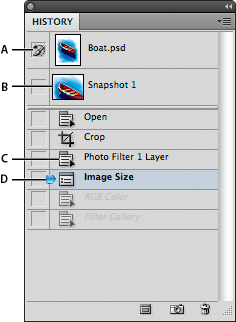
History panel
Use the History panel to jump to any state of the project created during the current working session. Each time you apply a change to some part of the project, the new state of that project is added to the panel. You can modify the project from the state you select. History states aren’t available for actions within the Capture panel.
The following guidelines can help you with the History panel:
-
Program-wide changes, such as changes to panels, windows, and preferences, are not changes to the project itself and so are not added to the History panel.
-
After you close and reopen the project, the previous states are no longer available in the History panel.
-
The oldest state is at the top of the list, and the most recent one is at the bottom.
-
Each state is listed with the name of the tool or command used to change the project as well as an icon representing the tool or command. Some actions generate a state for each panel affected by the action, such as the Titler. Actions you perform in such a panel are treated as a single state in the History panel.
-
Selecting a state dims those below it, to indicate which changes are removed if you work from the project at that state.
-
Selecting a state and then changing the project removes all subsequent states.
-
Do any of the following:
-
To select a state, click the name of the state in the History panel.
-
To navigate in the History panel, drag the panel’s slider or scroll bar; or choose Step Forward or Step Backward from the panel menu.
-
To delete a project state, select the state. Then choose Delete from the panel menu or click the Delete icon and click OK.
-
To clear all states from the History panel, choose Clear History from the panel menu.
-
Events panel
The Events panel lists warnings, error messages, and other information you can use to identify and troubleshoot problems, particularly those associated with plug-ins and other components from third-party developers.
An alert icon 


-
Do either of the following:
-
Double-click the alert icon in the status bar.
-
Choose Window > Events.
-
-
Do any of the following:
-
To learn more about an item in the list, select it and click Details.
-
To clear the events list, click Clear All.
-
Event notification
In addition to the alert icon in the Events panel, a notification pop-up window appears in the lower right corner of the user interface.
The notification appears for a few seconds, and the background color of the notification indicates the type of event. For example, error notifications have a Red background, warning notifications have a Yellow background, and informational notifications have a Blue background.
The notification pop-up window appears by default. If you want to turn it off, deselect Show Event Indicator under the General category in the Preferences dialog.