Fix Data error cyclic redundancy check SSD. “Windows 7 doesn’t recognize my SSD drive. When I go to disk management, it shows a message to initialize it (image no.1) but when I press OK to do that, one another message appears and says: Data error cyclic redundancy check (image no.2). My computer windows doesn’t show that drive and also when I went to cmd->diskpart, again it didn’t show that disk to use of chkdsk /f command. How to solve the problem please?”

What is Cyclic Redundancy Check?
Cyclic Redundancy Check (CRC) is a data verification method or an error detection code commonly used in digital networks and storage devices to detect random changes to raw data. And this Cyclic Backup Check Error is caused by various factors like registry corruption, misconfiguration of files, messy hard drive, loss of power, etc. This error restricts you from copying files, making the hard disk fail accessible as well as causing problems on initialization. If you are also struggling with a similar problem, here are effective solutions to apply.
Cyclic redundancy check error fix
If you are having cyclic backup data error check your external hard drive or HDD (will not copy data, drive is inaccessible) and Data on Drive is not important to you then you just need Right Click and Format Drive. But if you find an important file, you need to recover it from the error first with the help of EaseUs Data Recovery tool or Wondershare Data Recovery.
Note: The solutions below are applicable to Fix Cyclic Backup Check data errors for all HDDs, external HDDs or USB drives.
Run Disk Error Checking Tool
Try to fix the error first with the help of Windows Disk Error Checking Tool Built-in Utility .
- Right click on the drive keeps saying cyclic failover check,
- Select Properties the Tools.
- Next, click Check Now under “Error Checking” as shown below.
- Then click Scan and repair drive to check and fix the drive.

If you are a Windows 7 user Tick “Automatically fix the file system errors” and click Start to perform a basic check and automatically fix the problems found.
Run Disk Usage Check
Alternatively, you can Run the powerful CHKDSK command with some additional parameters to force chkdsk to check for and repair drive errors.
- First open Command prompt as administrator
- Type chkdsk D: /f /r and press Enter.
Note: the letter “D” must match the drive on which you want to run the scan.
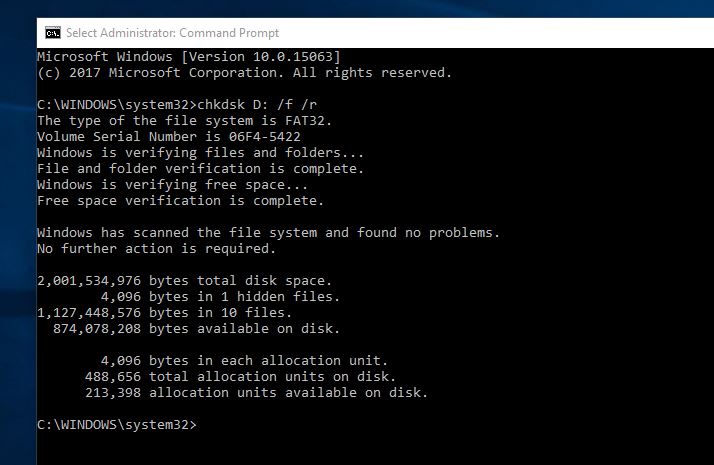
Then wait for the scan to complete. Once done, CHKDSK will show you the report, Now Restart your computer to start everything again.
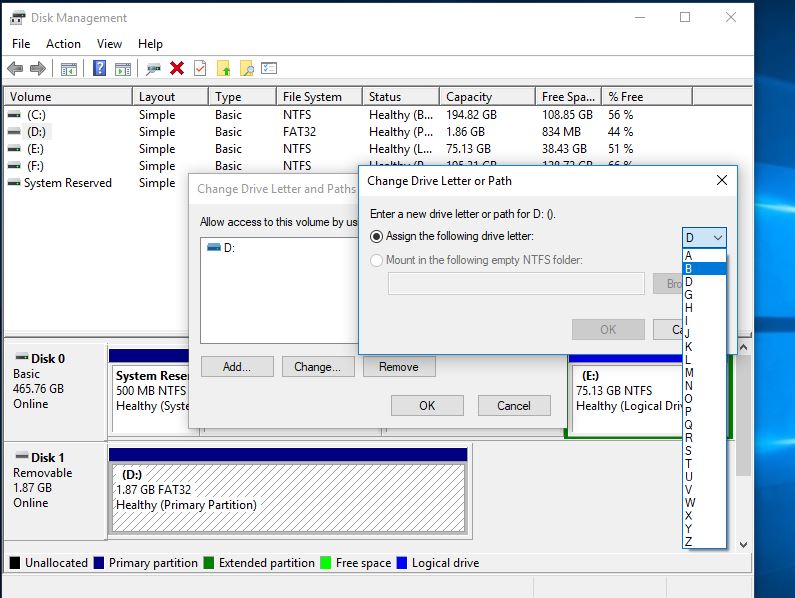
Change drive letter
If you notice a Cyclic Backup Data Error, the problem Check starts After changing the drive letter, Then try to recover the previous one.
- Press Windows + R, type diskmgmt.msc and ok.
- This will open the Disk management Window,
- Here Select the problem drive and right click on it
- Now select Change drive letters and paths.
- Click the Change button then restore the previous drive letter and click OK.
Using Diskpart Tool
Note : If you are having this problem on System Drive ( C: Drive ), below steps do not apply. Contact a computer technician or HDD support to resolve the issue.)
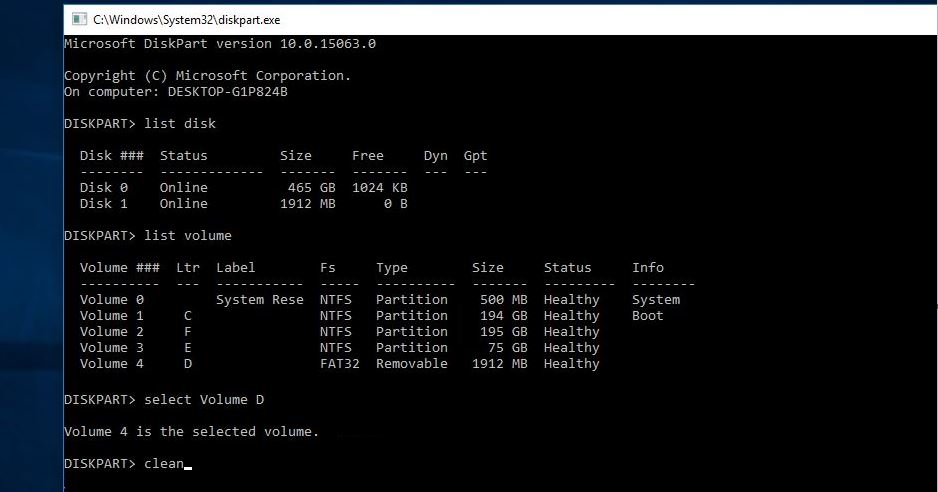
Alternatively, you can fix this using diskpart. (A powerful tool for hard drive management) Command Tool. Note: Steps Erase your data, Be careful and Backup your Data before performing these steps.
- Open command prompt as administrator,
- Type diskpart and press enter key,
- Use list disk to identify all available devices.
- Then type list volume to list all available drive letters.
- Now type select Volume D (Note: Replace D with the volume number assigned to the device) to select the problematic drive.
- Then type Clean to clean the drive.
- Now you will create a new partition using create partition primary
- Type select partition 1 command to select the recently added partition.
- Then type activate command to activate the new partition
- Next use the command format FS=NTFS label=[add the letter your new drive] quick . (to format the drive) Enter the command without brackets.
- Type assign letter=Y (replace Y with the character you want to assign to the device).
Format the drive
If the Over All solution doesn’t work, Still Getting Cyclic Backup Data Error, then try to format the problematic drive. Note: Formatting Drive will Erase all Data, But Data is most important to you, then you can use Professional Data Recovery Tool to recover it. and This Step does not apply to the system drive (C: Drive)
To format Drive, open Command prompt as administrator
then type format D: /FS:NTFS and press enter key.
(Note: Replace D: with the letter of the problematic Drive.)

These are some of the most applicable solutions to fix the problem of Cyclic Fallback Checking Data Errors for All HDDs, External Drives or USB Drives. I hope After applying the above solutions your drive will work properly or If still having the same problem I think it’s time to check the Disk with Manufacturer for support.
cyclic redundancy check data error on Outlook
If you are experiencing cyclic fallback check errors on Outlook. Then first check the drive for errors using the CHKDSK Utility and repair corrupted system files. And repair your Personal Storage Table (PST) file with Inbox Repair Tool from Microsoft Support Site.
Fix Data error cyclic redundancy check SSD
To change the file format of your SSD drive to exFAT, let’s try the following steps.
Step 1: Check Disk
Since you were facing a cyclic redundancy error, I would suggest you to run a check disk on your drive before performing any other actions.
Please refer to the article below to run the chkdsk command.
Run Check Disk from the Command Line to Find and Fix Errors
http://technet.microsoft.com/en-us/magazine/dd637756.aspx
(use chkdsk /f followed by chkdsk /r)
Step 2: Reformat hard drive using command prompt
1. Open a command prompt by typing cmd into the Start/search box, right-click the cmd search result and choose “run as administrator”
2. Type format g: /FS:exFAT and then Enter to begin formatting the G drive as exFAT
again use of Parted Magic tool. But this time its new version. Use it to both format it and in exfat too.
Video