Solved: Why can’t I install MacOS Monterey on my Mac? You get the error message “macOS could not be installed on your computer” when updating macOS on your Mac but don’t know how? Here are detailed ways to fix this error on macOS.
Updating your Mac is simple and necessary, but it can be complicated if the update fails and you get an error message saying macOS couldn’t be installed on your computer.
Why can’t I install MacOS Monterey on my Mac?
There are a lot of different reasons why errors can occur when installing macOS updates. Hopefully the error message will show exactly what the problem is, and that way you can know where to go to fix it.
How to fix the error cannot install macOS on the computer (1)
Before getting into the detailed fix, here are some of the most common reasons why macOS can’t complete the installation:
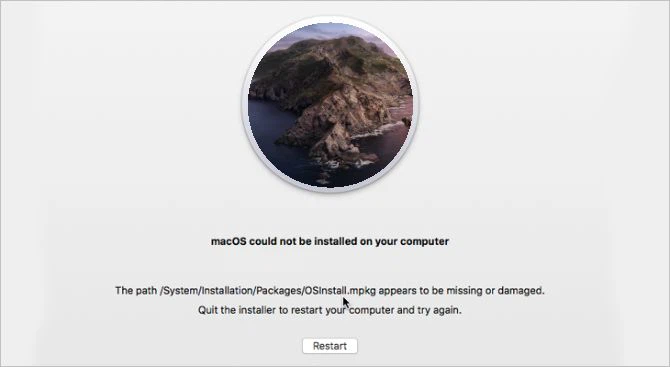
Path /System/Installation/Packages/ OSInstall.mpkg is missing or corrupted
Not enough free space on Mac
Error in macOS installer file
Problems with your Mac’s boot drive
Incompatible hardware
Whatever the cause of the macOS installation error, you can usually fix it yourself in one of the ways below.
If you can’t complete the macOS installation, you may find your computer stuck in a loop where the installer reopens every time you restart your computer. Follow the quick steps below to get out of that loop and protect your data before you fix the error.
Solutions for “can’t install MacOS Monterey” issues
Step 1. Start your Mac in Safe Mode
Safe Mode on Mac prevents various programs from launching at startup, including the macOS installer. Starting your Mac in Safe Mode helps you get rid of any boot loops and prevents troublesome programs from running in the background.
To boot into Safe Mode on an Intel-based computer, restart your Mac and hold down the Shift key while powering on. Release the key when you see the Apple logo or hear the startup sound and you’ll see “Safe Boot” in the menu bar on the login screen.

On a computer with Apple’s M1 chip, turn off your Mac and then press and hold the power button until the boot options screen appears. From here, select Startup Disk, hold down the Shift key then click the Continue in Safe Mode option.
Step 2. Create a new backup using Time Machine
It’s important to back up the data on your Mac before installing a major macOS update. These updates edit core files in the operating system, so if something goes wrong you may need to completely wipe your Mac to fix it.
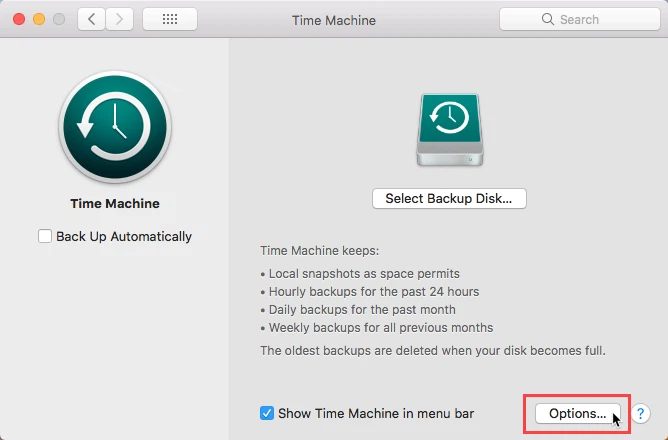
Connect an external drive and back up your Mac using Time Machine. Time Machine is the simplest way to protect all data in incremental backups. This allows you to restore data from specific dates instead of just keeping the latest version of everything.
Step 3. Check Mac Compatibility in the App Store
Before you start with installation troubleshooting, you need to make sure that the latest version of macOS is compatible with your Mac. Go to Apple’s support website and click the link for the version of macOS you want to install to see the hardware requirements. Click the Apple icon in the menu bar and choose About This Mac to compare those claims with your Mac.
If your Mac isn’t compatible, that macOS version upgrade won’t be able to install. This could be the first sign that it’s time to replace your Mac.
What to do when macOS installation can’t be completed
Once you’ve backed up your Mac and made sure it’s compatible with the latest version of macOS, it’s time to try the installation fixes below.
Since there are many potential causes of macOS installation errors, one of the solutions below should be able to fix the problem. Let’s start with the fastest and easiest way to save you time.
Restart your Mac and try the installation again
Sometimes, all you need to do to fix a macOS error is restart your Mac and try again. Open the Apple menu and select Restart from the drop-down menu. If your Mac is unresponsive, press and hold the power button to turn it off.
However, do not do this while the installation is in progress, as doing so may damage files in the operating system.
Set your Mac to the correct date and time
It’s possible that the date or time on your Mac is showing up wrong. When this is the case, it can lead to connection problems with Apple’s servers, which can be the reason for the error when installing macOS.
Open System Preferences and go to Date & Time to modify it. Click Padlock and enter the administrator password, then select Set date and time automatically .
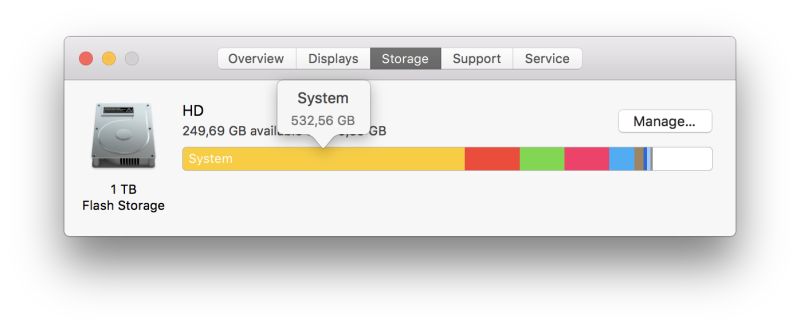
Make enough free space to install macOS
A macOS installer typically takes up about 4-5GB of space on a Mac. But to complete the macOS installation, the computer actually needs about 20GB of free storage space.
This is because the macOS installer needs more space to unzip files and folders. Without that extra space, the installer has nowhere to go and can’t complete the installation on your Mac.
Open the Apple menu and go to About This Mac > Storage menu to see how much free space is on your Mac. Click Manage Storage to see what’s using the most space and then figure out how to free up more storage on your Mac .
Download a fresh copy of the macOS installer
The macOS installer on your Mac may have somehow become corrupted. You should try deleting the existing installer and downloading a new one instead.
Most older macOS installers are available directly from Apple’s support website, which provides the full hybrid installer, rather than a smaller version available through System Preferences or the App Store. However, you may need to download the installer from the App Store for newer versions like macOS Monterey.
Reset PRAM and NVRAM
PRAM and NVRAM are where various settings and options on your Mac are stored, like screen brightness, audio volume, and screen resolution. Errors with PRAM or NVRAM can explain why macOS can’t be installed on the computer.

It’s relatively easy to reset the PRAM or NVRAM settings on a Mac, and it won’t erase any personal data currently on the computer. To do so, restart your Mac and hold Option + Cmd + P + R while powering on.
Keep holding all those keys until you see the second Apple logo or hear the second boot sound, at which point the PRAM or NVRAM reset will complete.
Run First Aid on the boot drive
After trying the above, still can’t complete the macOS installation? This can be caused by a fragmentation or drive permissions error on the boot drive. It’s fairly easy to fix most of these types of errors using the Disk Utility application, which comes pre-installed on macOS.
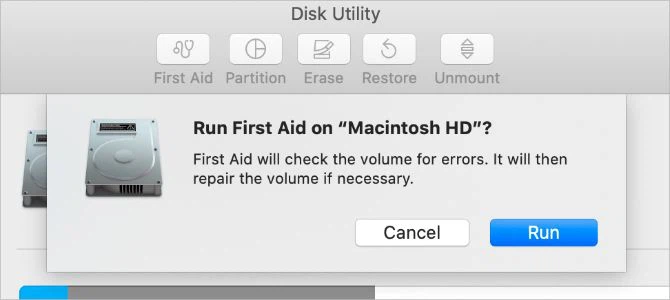
Open Disk Utility from the Utilities folder in Applications. Select your Mac’s startup disk in the sidebar, commonly called Macintosh HD, then click First Aid. When you run First Aid, Disk Utility will scan the drive for errors and repair whatever it finds.
If you can’t access Disk Utility normally, boot into macOS Recovery mode as shown below and try running First Aid again.
Use macOS Recovery to reinstall macOS
If macOS still won’t install properly, you may need to reinstall the entire operating system. This can be done using macOS Recovery mode on a Mac.
The process of booting into MacOS Recovery will vary depending on whether your Mac has an Intel or Apple processor.
On a Mac with an Intel chipset, restart the Mac and hold down the Option + Cmd + R keyboard shortcut simultaneously while powering on. Release this key combination when you see the Apple logo or hear the startup sound, then the MacOS Utilities window will appear.
On a Mac with an Apple chipset, turn it off then press and hold the power button until the boot options screen appears. Click the Options option and click Continue.
Once you have entered macOS Recovery mode, click Reinstall macOS to install the latest version of macOS. This can take a while because your Mac needs to download new software first.
Erase Mac and restore from backup
The ultimate troubleshooting solution to any software-related problem is to erase the startup disk and reinstall macOS from scratch. With the new version of macOS on your computer, you can restore all of your Mac data from a Time Machine backup.
If you don’t back up your Mac before erasing the startup disk, you’ll lose all of your data including your photos, music, files, and everything else.
As you can see, there are many reasons why you cannot install macOS on your computer. However, through the above instructions of FPT Shop, we hope that you have been able to fix this problem.
Fix Common Errors When Updating to MacOS Monterey
When installing this new operating system, first make sure that your Macbook device can run MacOS Monterey. Then, let’s see some basic errors and how to fix it!
a. macOS Monterey Download Failed
A common macOS Monterey problem that people have is that macOS MOnterey 12 fails to download. Usually you will encounter some error messages like:
- Installation failed.

- “The network connection was lost” message may appear when they try to download macOS Monterey.
- Or some people will receive an error message: “Cannot continue to install macOS. Installation requires downloading important content. The content could not be downloaded at this time. Try again later.” (Installation of macOS could not continue. Installation requires downloading important content. That content can’t be downloaded at this time. Try again later)
There are many reasons why the above errors can be caused by many people trying to download macOS Monterey at the same time. If so, for a successful installation, try again later during off-peak times to see if the download works. You can also check operating status of the Apple Server to ensure that the Apple server is not down. Usually, there are many cases where a second, or even third, installation is required to be successful.
If it’s the network, find a stronger Wifi network and try to install it again! Downloading MacOS fast or slow depends a lot on the network speed!
b. Not enough space to install macOS Monterey
This is a pretty common reason if you’re using a Mac with a small hard drive that’s almost full. There will be a message that the macOS OS download failed if you don’t have enough storage space on your Mac. Normally to update to MacOS, you need at least 15GB -20GB free to run smoothly.
To make sure you still have space, open the Apple menu and click “About This Mac” => Select “Storage” you will see the remaining hard drive space. If you’re running low on memory, click “Manage” in the Storage section and free up some space by deleting apps or heavy files you don’t or rarely use..
Then, to continue downloading MacOs Monterey, try opening the App Store and clicking “View My Account ” to see if there’s anything in the “Incomplete downloads” section. You can continue the download from there.
c. How to fix “Gateway Timed out” error when downloading macOS Monterey
In addition, there are a lot of complaints about stopping the download and the error message system “ Gateway Time-out ” or ” Bad Gateway ” error.
If you’re having this problem, try starting your Mac in Safe Mode (hold down Shift on the keyboard as it boots) to check for the problem, then try downloading and reinstalling macOS Monterey .
If that doesn’t work, try a MacOS Factory Reset using the Internet.
d. Finished running MacOS Monterey but won’t turn on
If after installing macOS Monterey, you cannot turn on your Mac. Then maybe your installation is corrupted, try to install it again. First try to do a Factory Reset by the simplest way over the Internet as follows:
- Start Mac then hold down the Option + Command + R key combination (or Command + R, just hold down the power button for a while) and release the keys when the message Starting Internet Recovery appears on your screen.
- In the menu that opens, select the Wi-Fi network and enter the password
- Wait for the progress bar to disappear
- In the Utilities window, select Reinstall macOS Monterey. follow the on-screen instructions to install.
Or for Macbooks using T2 Security Chip, you have one more way to revive your Mac with another working T2 Chip machine through Apple Configurator 2 .
e. MacOS Monterey stuck on “Setting Up Your Mac”
You have downloaded the MacOS Monterey operating system to your computer and are moving to the “Setting Up Your Mac” step, but you are stuck at this step, and cannot continue.
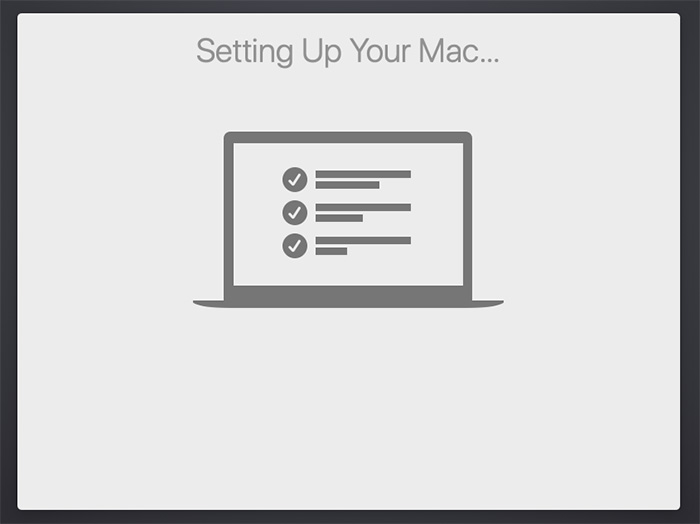
=> Don’t worry, the simple fix is just restart your Mac. This should be completely safe, since the installation has actually finished.
To restart your device, press and hold the power button for a few seconds until your Mac turns off completely. Wait a few seconds and then turn it back on. Your Mac will then continue to set up and successfully boot into macOS Monterey.
f. Troubleshooting macOS Monterey Sign In
If you’re having trouble signing in to your MacBook after installing macOS Monterey with accounts you forgot, here’s a quick fix:
- Step 1: First, restart your Mac and hold down Command + S on your keyboard as it boots up. (Mac will launch a special mode to fix hard drive errors. This mode is called: Single-User-Mode) This will boot you into a command prompt.
- Step 2: Enter the following command:
/sbin/mount -uw /Press Enter on your keyboard. Then enter the following:
rm /var/db/.applesetupdoneThis will delete a file, making it look like you’re starting macOS Monterey for the first time. Don’t worry, nothing important is deleted. Press Enter, then restart your Mac.
- Step 3: You will be asked to create a new administrative user account, re-enter your name and password to set up your account.
Fix software errors when using MacOS Monterey
a. MacOS Monterey runs slower, fan is loud
When you install MacOS Monterey, you will feel that your Mac is running slower. However, don’t worry too much, because the initial installation, MacOS 12 is still in the process of updating, after only 1 day or so, your Mac will return to normal operation. Or maybe it’s because you just installed an additional operating system, causing the machine to heat up, leading to a loud fan, and the machine running slower.
How to handle: You Reset NVRam to fix it by holding down the Option + Command + R + P . combination combination until the second boot chime sounds, then release.
You can also check the App Store and make sure the apps are all up to date and won’t cause interruptions in use.
b. Troubleshooting Battery draining fast
Some people feel that Macbook battery life is much shorter than when using a lower operating system. And you don’t need to worry, if this happens right after you upgrade, then the reason the new operating system is using a lot of power to set up applications. Therefore, the battery will run out faster, if that happens, you don’t need to worry because after the device is set up everything will be back to normal.
Or, if you want to save more battery, you can optimize power consumption by: Open System Preferences => Select Battery => Select Low power mode.

c. Email loading problem after Monterey upgrade
If you’re using the Email app after upgrading to macOS Monterey, you may have noticed that the content of some emails is no longer visible. To fix the error, do the following:
- In the Email menu menu, select Preferences
- In Privacy, uncheck the box Block All Remote Content
Maybe Antivirus has interfered with iCloud email to help block unnecessary spam emails. If not needed, you can uninstall your anti-virus software and install it after the developers solve the problem.
d. Trackpad not working issue on Macbook M1
After upgrading macOS Monterey, you may discover that the trackpad doesn’t work anymore on your Mac M1. If you are using an external mouse, plug it in and follow these steps to resolve the issue
To troubleshoot, follow these steps:
1. Connect a wired or wireless mouse to your Mac
2. In the Apple menu, select System Preferences.
3. In the Accessibility section, select Pointer Control.
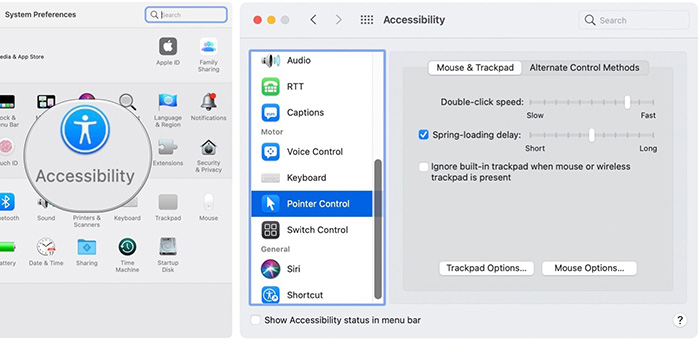
4. Uncheck the option: Ignore built-in trackpad when mouse or wireless trackpad is present
f. How to fix Messages error on macOS Monterey
If your Messages app crashes after upgrading to macOS Monterey, you don’t need to wait for the next release to fix the problem. You can easily resolve issues related to Messages by deleting the AddressBook-v22.abcddb file. Follow these steps:
1. Open Finder, on the Finder menu at the top of the screen, select Go and click Go to Folder.
2. Enter this path: “~/Library/Application Support/AddressBook“ then click Go
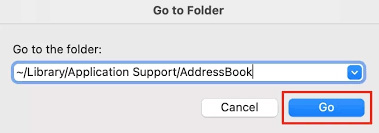
3. In the folder just opened, find the file AddressBook-v22.abcddb and drag it to the Trash
Now go back to Messages and try again to see if the problem is fixed!
TheArtCult hopes the article will help you fix the errors on this new operating system and help you use the device more smoothly! Good luck!