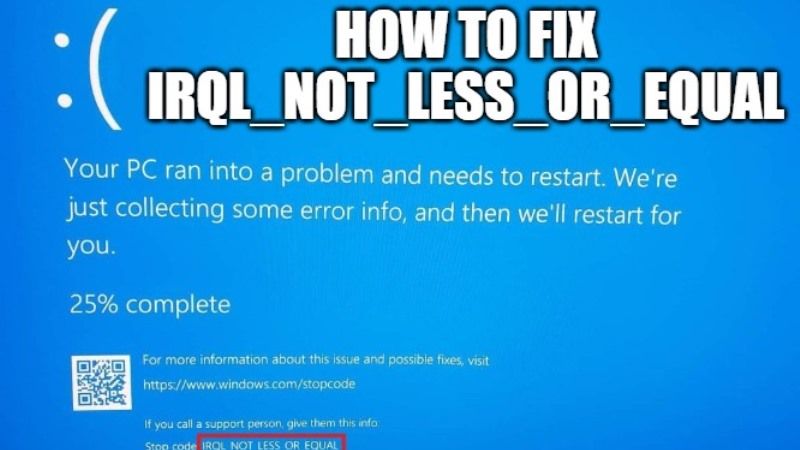
How to solve IRQL_NOT_LESS_OR_EQUAL Windows 11. IRQL NOT LESS OR EQUAL error is a memory related error and usually occurs when the system or driver process tries to access the memory address without the correct access.
What is IRQL_NOT_LESS_OR_EQUAL Error and What is the Main Cause?
The IRQL_NOT_LESS_OR_EQUAL error is mainly a memory related problem. The IRQL part stands for “Interrupt ReQuest Line” that Windows uses to signal events that need urgent attention. IRQL usually occurs when a device driver requests access to a memory address that it does not have the necessary permissions or access to.
Since memory allocation to processes typically has a set boundary, the “NOT_LESS_OR_EQUAL” part of the error indicates that the driver attempted to access an address that is outside or greater than the boundary value.
For your better understanding, below mentioned is a list of the most probable causes for this error. You can also use this list as a guide and search for any recent changes along the lines of:
- System files are corrupted.
- Driver is incompatible, faulty or outdated.
- Hardware failure or incompatibility, if you recently replaced the stick of RAM, consider switching to the old one and see if the problem persists.
- Sometimes, even a corrupted or incomplete software installation can be the culprit to the problem.
Now that you know some of the problems you’re having on your PC, let’s start with how to fix it to restore your PC back to normal.
How to solve IRQL_NOT_LESS_OR_EQUAL Windows 11
Method 1: Run Memory Diagnostics
Since errors often appear when there is a problem with system memory, it makes perfect sense to run Memory Diagnostics on board to rule out any possible causes.
First, go to the Start Menu and type Memory Diagnostics to do a search. Then, from the search results, click on the ‘Windows Memory Diagnostics’ box to launch the application on the computer.
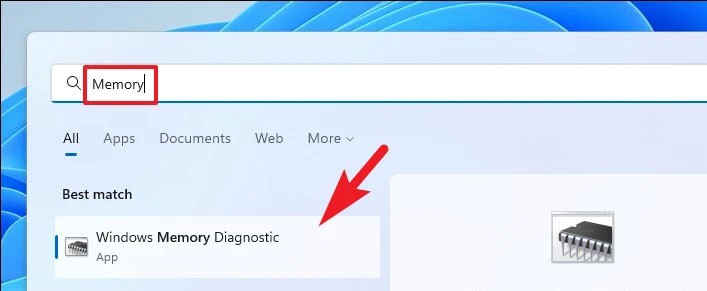
Next, click on the ‘Restart now and check for problems’ option to restart the PC and run the diagnostics.
The PC will not restart and perform the necessary tests on the memory, once done you will receive a comprehensive report after reboot if any problems are found.
Method 2: Fix the error by scanning DISM and SFC
There may be a problem with your PC’s core system files. This means that some system files may have been corrupted or damaged causing the problem.
This method is a two-step process, you will first have to run the DISM (Deployment Image and Servicing Management) tool to fix any problems with the System image used to repair the system. You will then need to call the SFC (System File Checker) command to fix any problems with the installed Windows files.
Since DISM is an administrator-level command, you will need to launch the command line tool as an administrator.
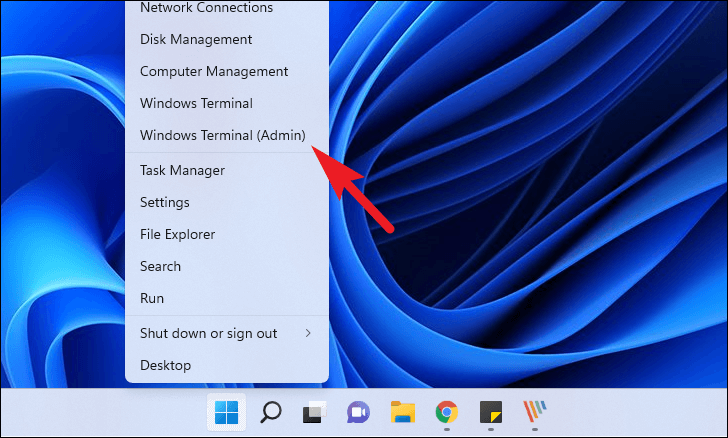
To do so, right-click the Start Menu on the Taskbar. Then click the ‘Windows Terminal (Admin)’ option If you are using an older Windows system, click to select the ‘Command Prompt (Admin)’ option from the overlay menu.
Regardless of the option selected, you will see a UAC (User Account Control) screen asking you to enter your administrator account credentials. If you are logged in as an administrator, simply click the ‘Yes’ button to launch the command line tool.
Now, if you selected the ‘Windows Terminal’ option, click the v icon (down arrow) from the tab bar. Then click to select the ‘Command Prompt’ option. Alternatively, you can press Ctrl+ Shift+ 2to open the Command Prompt tab.
Next, type or copy + paste the following command and press Enter to restore the System image.
DISM /Online Cleanup-Image /RestoreHealthNote: You must be connected to the Internet to get your System image. The command can also download some files in the background.
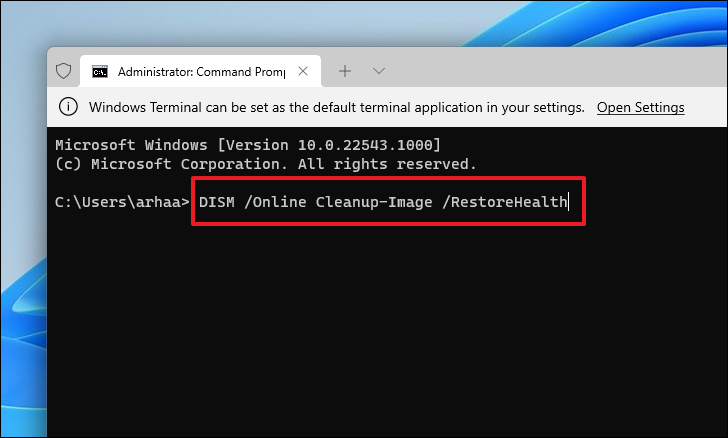
The DISM tool may take a few minutes to complete, depending on your system and internet connection speed. It’s normal for Command Prompt to appear stuck in the process sometimes.
Once the DISM process is complete, it’s time to run an SFC scan to fix the issues you’re having.
To run the SFC command on the machine, type or copy + paste the following command and press Enter.
SFC /scannow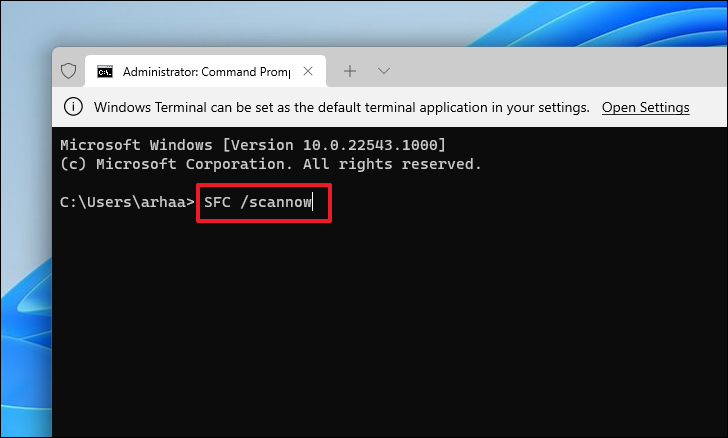
The SFC scan may take several minutes to complete. Restart the computer after scanning to see if the problem persists.
Method 3: Update or restore the driver
If you have recently updated your drivers or haven’t updated them for a while, that can definitely be one of the possible reasons for the problem on your PC.
In case you have recently updated the driver, just roll it back to the previous version and the problem will be eliminated, otherwise, if the driver is outdated, you will have to make sure that each driver is updated in the same way. handmade.
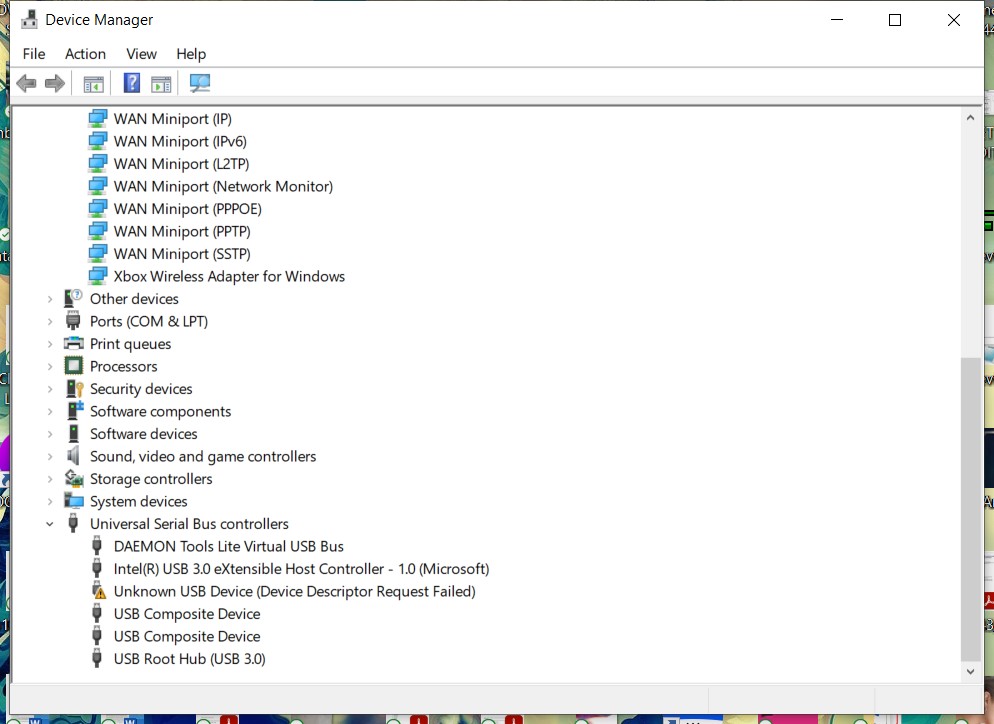
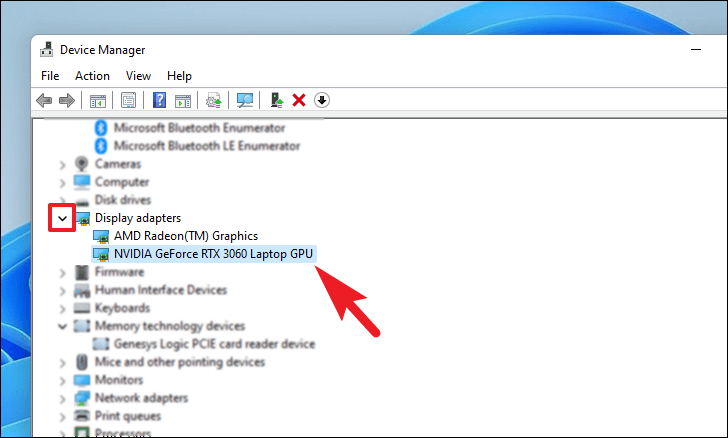
To do so, open the Start Menu and type Device Manager to search for it. Then, from the search results, click on the ‘Device Manager’ box to open it.
If you are here for driver recovery , find the component category where you recently updated the driver and double-click it to expand the section. Then, double-click the element to open its properties. This will open a separate window on the desktop.
Then from the properties window click on the ‘Driver’ tab. Then click the ‘Roll Back Driver’ button to roll back to the recent update. If the button is grayed out, the driver has not been updated recently and cannot be rolled back.

In case you are here to update the driver , on a component’s properties window click the ‘Update Driver’ button. This will open a separate window on the desktop.
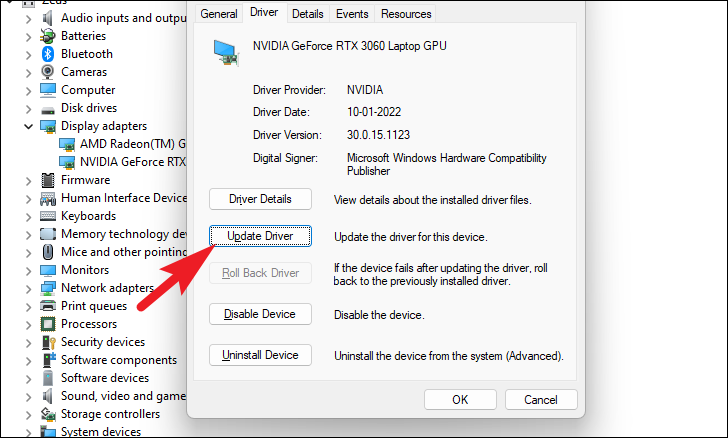
Then, from the ‘Update driver’ window, click ‘Search automatically for drivers’ to let Windows automatically search for drivers on its server. Conversely, if you already have the latest driver available on your machine, click on the ‘Browse my computer for driver’ option to browse the file using File Explorer.
Now, if you have more than one outdated driver or simply if you have many components for which you have not updated the driver recently, you will have to repeat the process individually to eliminate the possibility of this error. out of date. drivers on PC.
Method 4: Reset PC
PC reset is one of the most reliable methods to fix computer problems. You can also choose to keep or delete your personal files depending on your preference.
To do so, launch the ‘Settings’ app from the Start Menu. Alternatively, you can also press the Windows+ shortcut Ion your keyboard to launch the application.
Then, click on the ‘System’ tab on the left sidebar of the ‘Settings’ window.
Now from the right part of the window, scroll to find and click on the ‘Recovery’ option from the list.
Click the ‘Reset PC’ button; in the ‘Recovery options’ section. This will open a separate ‘Reset this PC’ window on the desktop.
On the ‘Reset this PC’ window that appears, you will have two options – both will remove all system apps and restore system settings to a new state. However, the Keep my files option will keep personal files intact, while the Erase everything option will completely clean the blocking media.
Click to select your preferred option from the ‘Reset this PC’ screen.
Then you need to choose between ‘Cloud download’ and ‘Local reinstall’. Cloud downloads are said to be relatively reliable and stand out as better than ‘Local reinstall’ as there is a possibility of corrupting or corrupting local files. However, the ‘Cloud download’ option will require an active internet connection.
Now click on the option of your choice to reinstall Windows on the computer.
Note: Neither of the reinstall options require you to plug in any external installation media.
Next, you will see your current settings to reset your PC. If you want to change these settings, click on the ‘Change settings’ option.
On the ‘Select settings’ window you have three options that will change the settings:
- Restore preinstalled apps? : As the name suggests, this option lets you choose if you want to reinstall all the apps that were pre-installed on your Windows PC. This will also restore system settings to factory defaults and return the device to a new state.
- Download Windows? : This option allows to switch from ‘Cloud download’ to ‘Local resintall’. In case you feel the need to change the callback method before it starts.
Once you have set the additional settings to your liking, click the ‘Confirm’ button to continue.
Click the ‘Next’ button at the bottom of the window.
It may take a while for Windows to load the next screen. Sit tight while the process runs in the background.
Next, Windows will list all the effects of resetting the PC. Read and click the ‘Reset’ button to initiate the reset process.
The machine may reboot multiple times, which is perfectly normal during a reset. The reset may take several hours depending on the computer and the selected settings.