Simple Digital Painting Steps – Daily Practice #1 Yoga Model Using Photoshop. Computers have brought change to every corner of modern society. One of these corners is art. The internet is full of concept art, desktop wallpapers and many other kinds of image that have been drawn by some user at a computer.
The program I used was Photoshop with available brushes. Please keep in mind this is more of a guide to my painting process and how I technically go about doing this.
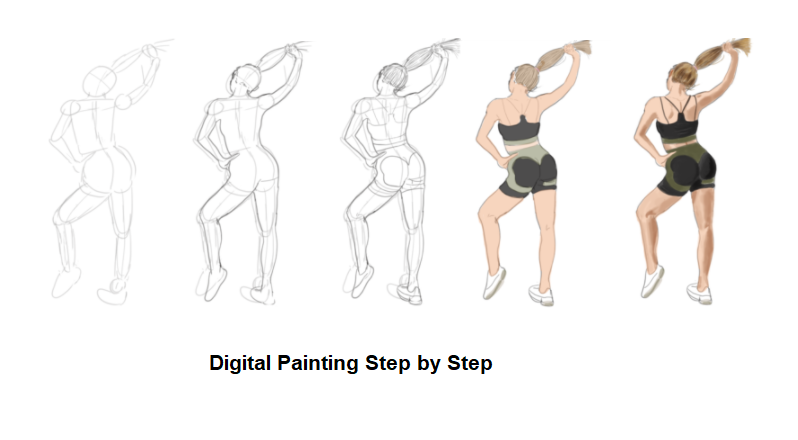 Step 1: Sketch
You can try freehand sketching. Take a thin brush of 2-3px, and sketch. Notice that you can do light and dark lines.
Step 2: Outlines
While there are a lot of ways to start a drawing, i tend to start off with a very rough sketch of the outlines. I do this on a separate layer, so that I can turn it on and off as I work on the rest of the drawing.
You can also adjust a bit so that the proportion looks right!
I suggest you to flip the image horizontally to see if your drawing or painting (later) is off somewhere.

If you simply want to flip an entire image, without any differentiation between layers, go to Image > Image Rotation > Flip Canvas. You will find options to flip the canvas horizontally or vertically, performing the same action consistently across all layers.
Step 3: Draw more details
Step 4: Base colors
Now you do not need the sketch layer, simply hide it!
So create a new layer, call it shading, and with a medium size brush, color in the shape. Press firmly so that it is opaque. Turn the outlines off and be amazed how irregular it is. So go around with a brush and eraser and neaten it up. Then you can turn the outlines back on.
Step 5: Shade and light
So create a new layer, call it shading, and with a medium size brush, color in the shape. Press firmly so that it is opaque. Turn the outlines off and be amazed how irregular it is. So go around with a brush and eraser and neaten it up. Then you can turn the outlines back on.
There are few things with only a single way to do them. With shading, there are so many ways that I shall not list them all. But these are the ones that I use.
Most importantly though, do not forget to work on the shading layer. It is a right pain when you draw something on the wrong layer. If you do, evaluate if you should do it again, cut-paste it, or ignore it.
With sketch and smudge, you simply, well, sketch and smudge. There’s no other way to describe it, so have a look at the image.
It does take time to smudge things in well, and a bit of care to not go over the edges, so don’t rush things.
Next step, we will Blend With the Brush Tool for Digital Paintings
It’s not going to automatically teach you how to render or understand structure or anatomy (which I hope I will cover in more tutorials in the future.), which is very important, of course, to the painting itself. That’s why I’ll be slowly going through and doing more tutorials on anatomy and structure in the next few months, hopefully!
A good practice for rendering is actually to do still life and human sketches. preferably with a pencil, and not digitally (yet). If you have any questions feel free to ask me!
NEXT STEPS: Simple Digital Painting Steps – Finalize your painting using Photoshop
READ MORE: DIGITAL DRAWING FOR BEGINNERS: BASICS OF DIGITAL SHADING
CHECK OUT MY OTHER ARTWORKS HERE
(To be continued)


