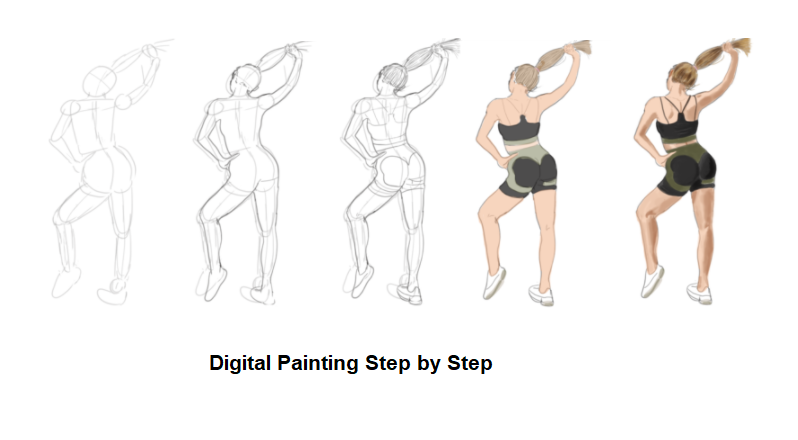
Simple Digital Painting Steps – Finalize your painting using Photoshop. There are different techniques that can be used to blend colors in Photoshop when you are painting digital. I’ll show you my own favorite technique to finalize your painting using Photoshop!
From the last post Simple Digital Painting Steps – Daily Practice #1 Yoga Model Pose Using Photoshop, we almost finished the painting. Now, we can hide the drawing layers and focus on blending then correct the detail.
 Step 6: Blend
To blend colors in Photoshop I use a brush, the same brush that is used to paint with or sometimes I prefer using a soft edged brush for smoother blending. The other tool I use is the eyedropper tool, this is used to pick up colors from your painting.
TIP: you can hold ALT on your keyboard to select the eyedropper tool
In the area I want to blend, I pick up a color and glaze it over the adjacent color. I keep my opacity set to pen pressure (this can only be done if you have a pressure sensitive drawing tablet) and set the opacity of the brush to 50% or sometimes even lower.
I keep picking up colors and glazing till the colors are nicely blended.
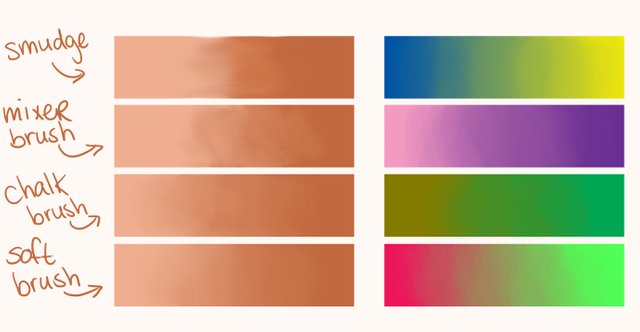
The mixer brush is pretty nice though, you can play around a lot with its settings.
TIP: use [ and ] on your keyboard to easily adjust your brush size
With my eyedropper – glazing technique you can use any brush you like, I usually use something like the chalk brush, but when I want smoother transitions, I grab a soft round brush.
As we’ve already learned, quick effects often mean they’re out of our control. In this case, blending with big strokes flattens the object and makes it unnaturally smooth. Even if you add a photo texture afterwards, it will not take that “plastic” effect away. Again, this method may be good only for that starting phase.
If you want to get a nice subtle texture (which is good for most of the natural materials), use a harder brush with Flow controlled by pen pressure (the harder you push, the more solid the stroke).

This kind of brush lets you control the amount of color you want to use.

Thanks to this attribute, you don’t need to blend the border between two colors. You just start with the base color and cover it lightly with the other one. Then you can add another layer of the same color, making it more solid.

If you want to make it smoother, just pick a color somewhere in between and paint lightly over the border.

For a stronger texture, use a textured brush (with rough edges).
Step 7: Finalize your painting
Now we are going to finalize the painting using eraser to remove all of the unneeded stuff and clean up the edges of your brushstrokes.
We finish the piece with sharp dynamic brush strokes, subtle color fills and fine details through the gradual building-up of layers. You will learn techniques to add realistic shadows, and liven up the skin and hair with highlights.
Also, we can add more details such as tattoo, textures for the sport shoes and the outfit to make our character look even more realistic.
CHECK OUT: 10 free Photoshop brushes for painting clothes
Conclusion
Despite the title, some might still consider these steps “hard”. But the concept of hard work is subjective. And honestly, unproductive feelings only waste time. What you may consider hard to paint is different from person to person. But at the end of the day we all have one thing in common:
We just want to make better art.
Take a leap in trusting yourself, but be honest with your strengths and weaknesses. Picture yourself as a mad scientist experimenting with different methods for the perfect painting formula. Master that formula and your work will reflect it.
I hope you’ve enjoyed learning these steps to creating better digital paintings. Good luck along your creative journey; feel free to share your own progress with us, and leave any questions below!