how to make id picture in photoshop : Adobe Photoshop Tutorials: How to Make Your Own ID Picture. Have you ever needed an ID photo but didn’t want to spend money to go to the studio? Well, you can take your own picture at home and edit it to make a 1″x1″ ID photo.
All you need is a digital camera and a computer with Adobe Photoshop or some other photo-editing software installed. If you’re taking the picture yourself, you’ll also need a tripod or a tabletop. Here’s how to do it.
Step 1: Taking The Shot
For those who already have an old digital photo that you want to use, you may proceed to step 2. But for those who don’t, let’s begin by taking a shot.
Find a suitable place in your house. Check the following:
Lighting
There should be enough light in the room, be it sunlight or fluorescent light. If harsh sunlight streams into the room, you might want to draw thin curtains to soften the light. Try to even out the light in the room by placing light sources (lamps, if you have them) in all corners.
Background
Find a room with a plain wall for your background. This will make editing the photo easier later on. Don’t worry if it’s not the right color (some IDs require a specific color for the background, like blue for instance), you can always change it using Adobe Photoshop later on. If your house has printed wallpaper, find the least cluttered design to simplify editing.
Position yourself in a comfortable position in front of the camera (placed on a tripod or tabletop). If there is nobody to take your picture for you, use the camera’s timer feature to take the shot.
Experiment with different camera settings until you find the best output. For example, take one with the flash and another without the flash. Use the auto feature and then try the manual settings. The more pictures you take, the better the chances you’ll find one that you’ll really like.
Step 2: Editing the Photo
Upload all the shots to your computer and find the best one. Once you have selected the photo that you want to use, right-click on the thumbnail and select Edit with Photoshop (or you can use whatever photo editing software you have, but I will be using Photoshop for this purpose).
Create a copy of the photo by going to Select > All, then Edit > Copy. Open a new document and click on Edit > Paste. You now have a copy of the original photo. Close the window of the original photo.
Depending on the shot that you have taken, you may want to do several things. You may want to adjust the exposure if the picture turned out too light or too dark. You may want to even out the shadows and highlights. But let’s take this case as an example.


The subject could’ve been positioned facing the window, but the background would’ve been a closet with painted designs; a plain background was needed to make editing easier. So first, the level of shadow/highlight of the photo had to be “fixed”.
Balance Shadows and Highlights
To balance out the exposure of the dark areas (shadows) and the light areas (highlights), I used the Shadow/Highlight feature of Adobe Photoshop. You can find it by clicking Edit > Adjustments > Shadow/Highlight. The default values load when you select this feature. Adjust the values until you get the correction that you need.
Crop the Image
Next, I needed to crop the picture into a square shape. So I used the Crop feature which by default can be found in the toolbar on the left side of your working space. To maintain a fixed ratio of 1:1 (i.e. the height and width are the same), I held down the Shift key while clicking and dragging over the portion of the photo that I wanted to use.
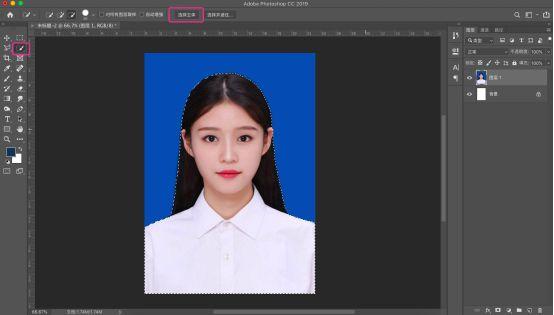
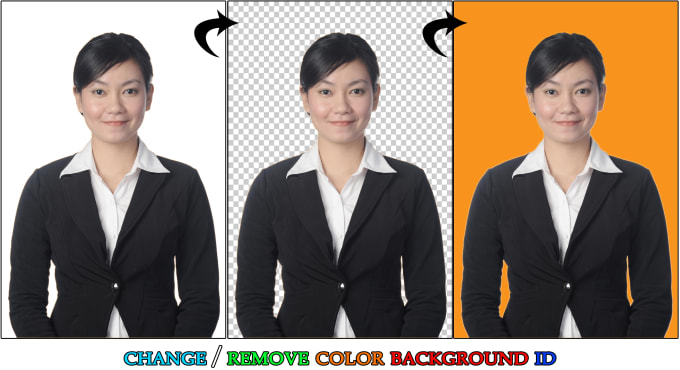
Remove the Background
If you’re lucky enough to have a wall the color of the background you need, then you can proceed to the next step. But in this case, the background is yellow and a blue background is needed, so I had to remove all the yellow. I did this using two methods:
- I used the magnetic lasso tool in Adobe Photoshop to select the parts that I want to remove.
- Then for the areas where the color of the foreground and background were too much alike to use the magnetic lasso with, I manually erased around the edges using the Eraser tool. Both the magnetic lasso and Eraser can be found in the toolbar on the left side of the workspace.
- Next, I cleaned up the jagged edges left by the magnetic lasso tool. I zoomed in really close and used the Eraser tool to smoothen out the edges pixel by pixel. This may take time, but it will greatly contribute to a more professionally-done-looking photo.
Add a New Color Background
Now that we have removed the original background, we are ready to add a new one. First, create a new layer by clicking Layer > New > Layer. On the layers tab on the lower right corner of your workspace, click and drag the new layer so that it is under the layer of your photo. Go to Edit > Fill and select the color you want for your background. In my case, I needed blue.
Adding a Gradient Effect
You can also put a gradient effect to your background so that it’s lighter in some areas and darker in some. In our example, I used a radial gradient: The center circle is the lightest getting darker as it reaches the edges of the background. Watch the video below for a demonstration on how to create gradients.
Resize the Image
Lastly, you need to resize the image to the size that you need. Go to Image > Image Size and specify the height and width in inches (1″x1″ or 2″x2″ depending on the size that you need), and change the resolution to 300 pixels per inch to ensure that your photo is printed in high resolution.
Final Step: how to make id picture in photoshop- Ready to Print
You now have an ID picture. Just take it to your nearest photo printing lab, and they’ll print it right out in seconds. It’s much less expensive than going to the photo studio and having your picture taken professionally, but it’s also good.
Adobe Photoshop Tutorials: How to Make Your Own ID Picture