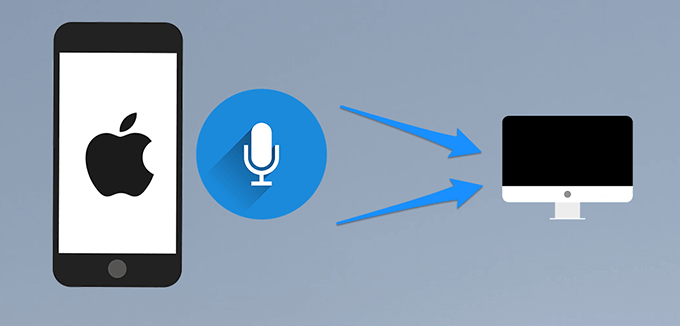
How to Use iPhone as microphone Bluetooth for Mac. Although the MacBook is equipped with a Microphone that allows you to record and talk to people via FaceTime. However, if you want to record professional audio then consider using an external microphone as the built-in microphone on a Mac isn’t the best. It is interesting that if you have an iPhone, and use it as a microphone for your MacBook, the recording mic on the iPhone is considered to be of very good quality. To connect iPhone and use it for Mac as a mic, you need to do some settings on iPhone and Mac as shown below.
Requirements to use Continuity Camera on Mac
As part of macOS Ventura , Apple has launched a new feature called Continuity Camera, which allows you to use your iPhone as a webcam for your Mac. An extension of this feature allows you to use your iPhone as the Mac’s external microphone. However, Continuity Camera has some key requirements for it to work.
First, you must be using iOS 16 or later and have at least one iPhone XR from 2018. Otherwise, your Mac must be running macOS Ventura or later. If you’re not sure, you can check which version of macOS is compatible with your Mac. If it’s compatible, update your Mac to macOS Ventura if you haven’t already.
Additionally, Continuity Camera requires that both iPhone and Mac use the same Apple ID with two-factor authentication enabled .
Another requirement is that your iPhone and Mac must be close to each other and have Bluetooth enabled . Neither your iPhone nor your Mac should share their respective Internet connections.
How to Use iPhone as microphone Bluetooth for Mac
Once you’re sure you meet the above requirements, follow these steps to use your iPhone as a microphone for your Mac:
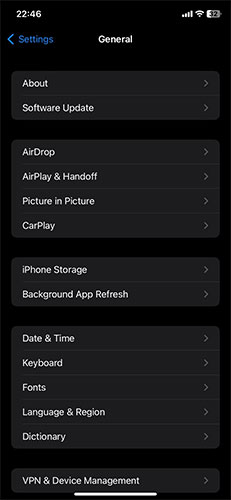
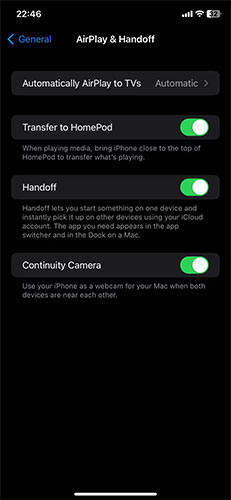
1. On your iPhone, turn on Continuity Camera by opening Settings > General > Airplay & Handoff > Continuity Camera. This feature is enabled by default but check to make sure you haven’t turned it off.
2. On your Mac, click the Apple icon in the top left.
3. Next, select System Settings from the menu.
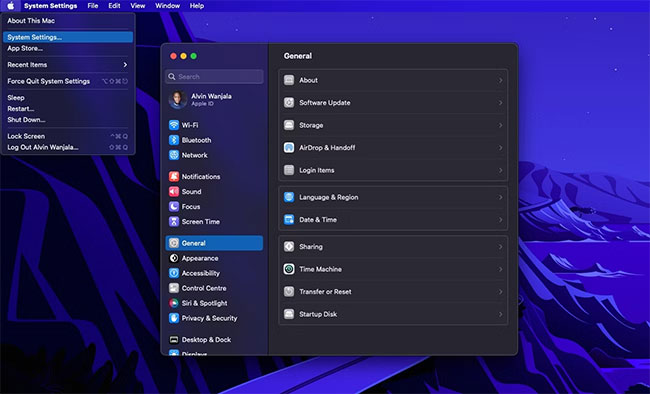
4. Click Sound from the left pane and select Input. Your Mac will display all available input options.
5. From the list, select your iPhone.
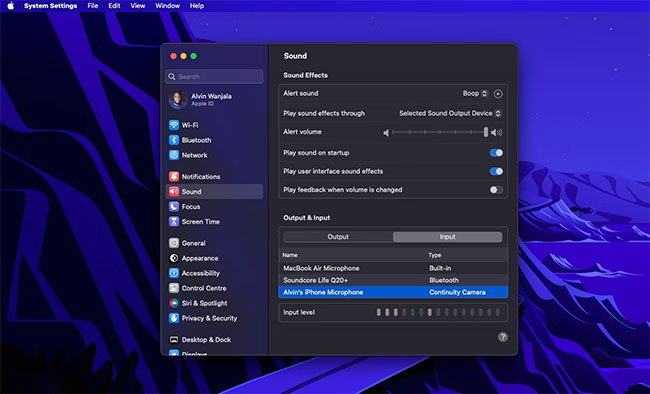
6. Your iPhone will then send a notification and display a screen stating that it is connected to your Mac as a microphone with options to pause or disconnect. Alternatively, you can also disconnect from your Mac if you want.
Mac users don’t have to buy an external microphone
If you have an iPhone, you don’t have to buy a separate external microphone for your Mac to get quality sound. Your iPhone can do that task for you, thanks to Continuity Camera.
All you need is macOS Ventura running on a Mac and iPhone XR or later running iOS 16. Don’t forget that Apple also offers other seamless features, such as allowing you to use your Mac to record your screen iPhone image.
Use your iPhone as a webcam on your Mac
With Continuity Camera, you can use your iPhone as your Mac webcam or microphone, and take advantage of the powerful iPhone camera and additional video effects. You can connect wirelessly, or with a USB cable for a wired connection.
Note: To use Continuity Camera, sign in with the same Apple ID on your Mac and iPhone. In addition, your devices must have Wi-Fi and Bluetooth turned on, and meet system requirements. See the Apple Support article System requirements for Continuity on Mac, iPhone, iPad, and Apple Watch.
Use your iPhone as a webcam or microphone
-
On your Mac, open any app that has access to the camera or microphone, like FaceTime or PhotoBooth.
-
In the app’s menu bar or settings, choose your iPhone as the camera or microphone.
The Continuity app opens on your iPhone and begins capturing audio or video from the rear camera.
Note: In order to use your iPhone as a microphone on a Mac without a built-in camera, the iPhone must be in landscape orientation and stationary.
-
Do any of the following:
-
Pause the video or audio: On your iPhone, tap Pause, or swipe up to unlock it.
-
Resume the video or audio: On your iPhone, tap Resume, or press the side button or Sleep/Wake button to lock it.
-
Stop using your iPhone as a webcam or microphone: On your Mac, quit the app.
-
Remove your iPhone as an option: On your iPhone, tap Disconnect. Your iPhone is removed from the camera and microphone lists in apps, and also from the list of sound input devices in Sound settings.
To add your iPhone back, connect it to your Mac with a USB cable.
-
If you need to charge your iPhone while Continuity Camera is turned on, use a USB cable for best results.
Automatically switch to the iPhone camera
Your Mac can automatically switch to using iPhone as a camera input for certain Mac apps, like FaceTime and PhotoBooth. To do this, your iPhone must:
-
Be close to your Mac
-
Have its screen turned off
-
Be in landscape orientation
-
Not be in a pocket or lying flat on a desk
-
Be stationary
If you’ve used your iPhone as a webcam on your Mac before, other Mac apps may also remember it as the preferred camera.
Make your iPhone the default microphone
You can make your iPhone the default microphone for your Mac.
-
On your Mac, choose Apple menu

 in the sidebar. (You may need to scroll down.)
 -
Select your iPhone in the list of sound input devices.
The Continuity app opens on your iPhone and starts capturing audio.

Turn on Desk View and video effects
When you use your iPhone as a Mac webcam, you can use Control Center to add video effects. For example, Desk View shows a top-down view of your desk and your face at the same time, and Studio Light dims the background and illuminates your face.
See Use Desk View and Use video effects.
If you don’t see your iPhone as a camera or microphone option
If you don’t see your iPhone in the camera or microphone list in an app or Sound settings, try the following.
-
Connect it to your Mac with a USB cable and check again. (If it’s already connected with a cable, disconnect it and reconnect it.)
-
Check the following:
-
Your iPhone is an iPhone XR or later (with iOS 16 or later).
-
Your iPhone has Continuity Camera Webcam turned on in Settings > General > AirPlay & Handoff.
-
Your iPhone recognizes the Mac as a trusted computer. See the Apple Support article About the ‘Trust This Computer’ alert on your iPhone or iPad.
-
Your iPhone and Mac have Wi-Fi, Bluetooth, and two-factor authentication turned on.
-
Your iPhone and Mac are signed in with the same Apple ID. (This feature doesn’t work with Managed Apple IDs.)
-
Your iPhone and Mac are within 30 feet of each other.
-
Your iPhone is not sharing its cellular connection, and your Mac is not sharing its internet connection.
-