How to completely disable GateKeeper and SIP on MacOS. If you’ve ever downloaded an app from the internet, outside of the App Store, you may have encountered an error warning that could not be installed. That’s because Gatekeeper and SIP (System Integrity Protection) – are 2 security tools that warn and deny access when using software downloaded from the network. However, there are many applications on MacBook not found on the AppStore that force you to install by downloading on Google or Safari. At that time, you will have to disable Gatekeeper to be able to install it. So how to turn it off? How to completely disable GateKeeper and SIP on MacOS? Let’s find out!
What are GateKeeper and SIP?
GateKeeper literally means Gatekeeper, and in MacOS, this is a built-in feature that helps keep the security and safety of the data and files on your Macbook.
SIP (System Integration Protection) aka system integration protection, it prevents users with root access (with sudo command) from modifying certain locations on the primary partition. SIP helps protect the core area of the drive where the operating system is installed from the risk of operating system failure. Toggling SIP you need to enter Recovery Mode to perform, so it can be said that SIP is also a Mac’s advanced protection feature.
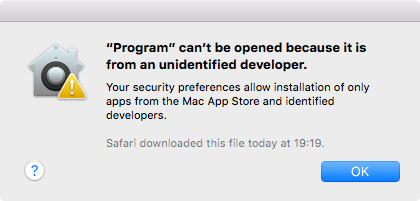
Many applications will be warned that they cannot be opened because they do not belong to the AppStore
In other words, both of these tools help to increase strict security and act as a Machine guard, alerting if something is suspected to be malicious and denying access to external applications to avoid problems. unnecessary.
To access Gatekeeper settings do the following:
- Step 1: Click on the Apple Logo => Select System Preferences (System Preferences)
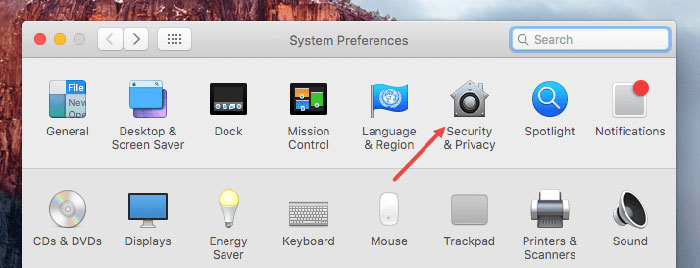
- Step 2: Select Security & Privacy
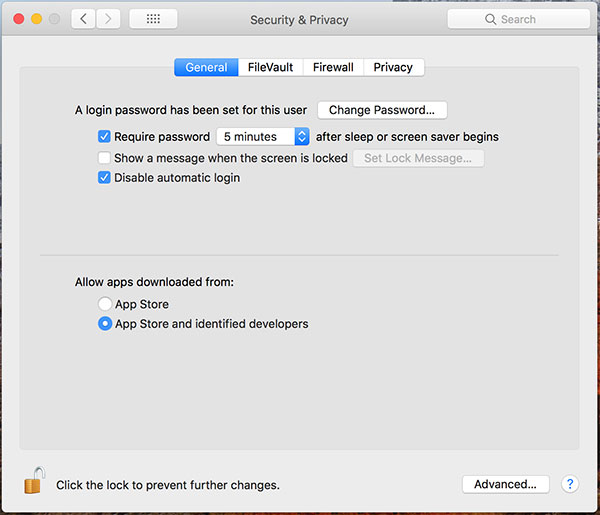
- Step 3: In the General Setting column, there will be an option to Allow apps downloaded from: if Gatekeeper is on, there are only 2 options: App Store and App Store and identified developers (identified developers).
Whenever you open an app downloaded outside of the App Store for the first time, Gatekeeper will issue a warning or prevent the app from opening. If the software has been verified by Apple to be safe, you should have no trouble running it. However, if macOS can’t confirm that the app is free of malware, Gatekeeper will prevent you from opening it.
And of course, for the software on the AppStore, of course, it will be blocked immediately. You will not be able to install external applications if Gatekeeper is enabled. Similarly, SIP is also a layer of security. Therefore, if you need to install external applications, first turn off Gatekeeper and SIP! Follow the steps below:
How to completely disable GateKeeper and SIP on MacOS
a. Turn off Gatekeeper using Terminal
To disable Gatekeeper, the fastest and simplest way is to use Terminal (This is an interface that allows you to enter and execute advanced commands for Macbook quickly).
To disable Gatekeeper, follow these steps:
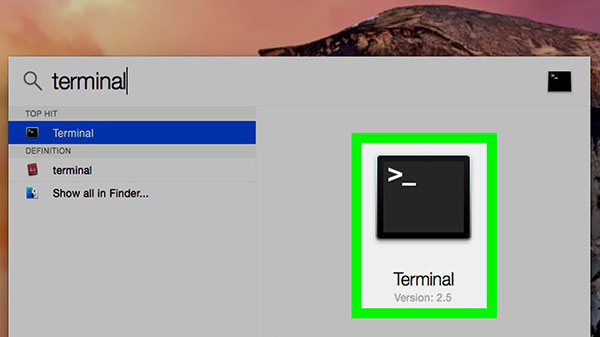
- Step 1: Open Terminal by pressing Command + Space to open Spotlight, then type search “Terminal” and double-click the application to open it.
- Step 2: Enter the following command: “sudo spctl –master-disable“
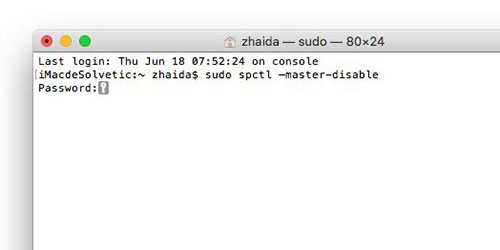
- Step 3: Press Enter and enter your admin password when the Pass and key line appears (When you enter the password, it will not appear but you just enter it) then press Enter again to finish the shutdown process. Gatekeeper.
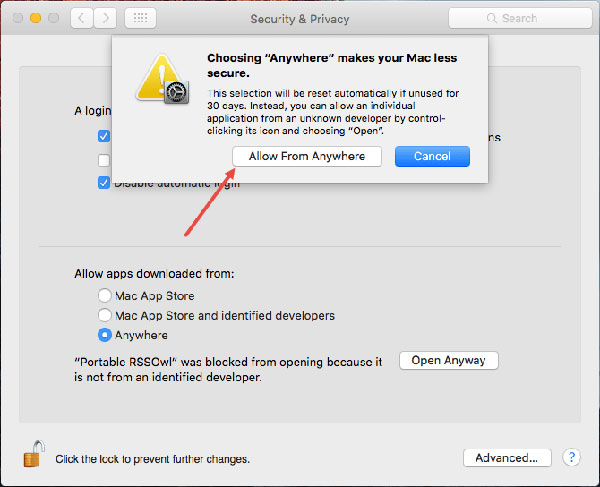
After you turn off Gatekeeper, you will have 1 more place in the Allow apps downloaded from section, which is Anywhere – You check this box to allow you to download it. apps outside the AppStore already. You can also use this method to check if Gatekeeper is definitely turned off (if not, there will be no 3rd option).
b. Enable Gatekeeper with Terminal
When you want to re-enable protection and re-enable Gatekeeper again, you can easily enable it with a simple Terminal command.
To enable Gatekeeper, follow these steps:
- Similar to the above, you press Command + Space to open Spotlight, then type search “Terminal” and double-click the application to open.
- Enter the following command:
sudo spctl --master-enable - Press Enter and enter your admin password if prompted. And finally press Enter again to confirm.
When you re-enable Gatekeeper protection, the Anywhere option that you found in System Preferences => Security & Privacy => General will now not available anymore. That’s also a way you check if the cream has successfully activated Gatekeeper.
c. How to check Gatekeeper status using Terminal
If you are not sure about the current status of Gatekeeper and want to check if the desired changes have occurred, besides going into System Preferences to check as above, you can use another command.
To check the Gatekeeper status, follow these steps:
- Step 1: Press Command + Space to open Spotlight, then type search “Terminal” and double-click the application to open.
- Step 2: Enter the following command: spctl –status
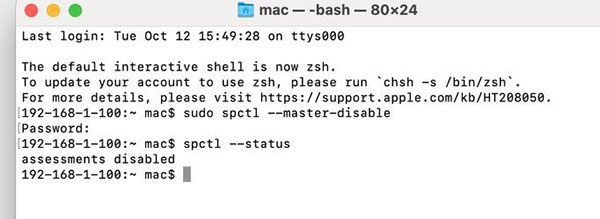
- Step 3: Finally press Enter to check. If the result is: assets disabled, you have successfully turned off Gatekeeper, and if it is enabled, you are still turning on that protection mode!
How To Disable SIP Using Terminal in Recovery Mode
Disabling SIP is not done right on the MacBook interface but needs to enter Recovery Mode to install. You can disable SIP as follows:
- Step 1: Restart (or Restart the machine if it is on) and hold the Command + R key combination until the Apple logo appears and wait until it enters Recovery Mode. In some new models, this box is not displayed, remember to select the User you log in and enter the password, the box will appear as below!
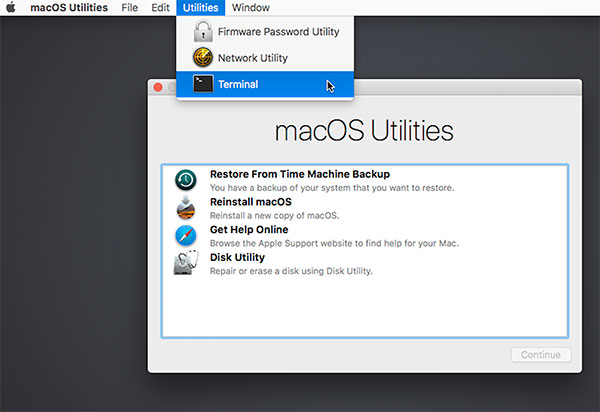
- Step 2: In Recovery Mode, select Utilities => Select Terminal
- Step 3: Type in the command line: csrutil disable and press Enter
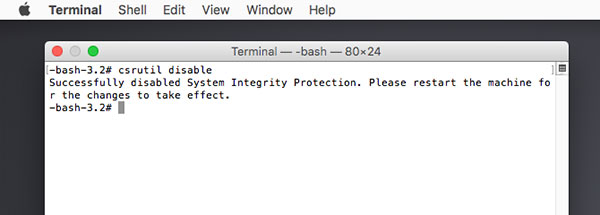
- Step 4: If the machine shows the line Successfully disabled System Integrity Protection, you have successfully turned off SIP.
- Step 5: Finally type reboot and then Enter to restart the machine is done.
And similar to the above if you want to re-enable SIP, change the command line above to: csrutil enable is okay!
Although sometimes you need to disable Gatekeeper and SIP to install external applications, most of the time you don’t need to do so. Because Gatekeeper and SIP tools will help your MacBook avoid malware penetration. Therefore, when you turn off this protection, you should also be more careful in choosing software when downloading. Apple’s built-in safety measures are always there to help, but sometimes too many limitations can get in the way. If you want to disable an important security feature, you should always learn the tool you’re working on and the potential consequences involved first.