How to fix Windows 11 Taskbar icon not showing. The Windows Taskbar can be an important element of the operating system for some users. It has a Start Menu button, pinned apps and programs, shows the date and time, and other important system information like battery percentage, and more.
Why is my Taskbar not showing?
The Windows 11 taskbar has a new look that comes from an improved version of its functionality. The Taskbar currently relies on a number of services and the Start Menu itself to function properly. Looks like the upgrade from Windows 10 to Windows 11 seems to mess up the Taskbar. As it depends on the version of Windows 10 you have installed on your system and the version of Windows 11 you are updating.
Also, the recent Windows Update that was released last month also seems to cause this problem for some users while others are also facing the same problem due to system time mismatch though everything was set up properly. There are many ways to fix the Taskbar and we recommend starting with each one below.
How to fix Windows 11 Taskbar icon not showing
Use the methods below to start fixing the Taskbar on Windows 11. If you have already tried restarting your system, you can skip the first method.
1. Restart PC
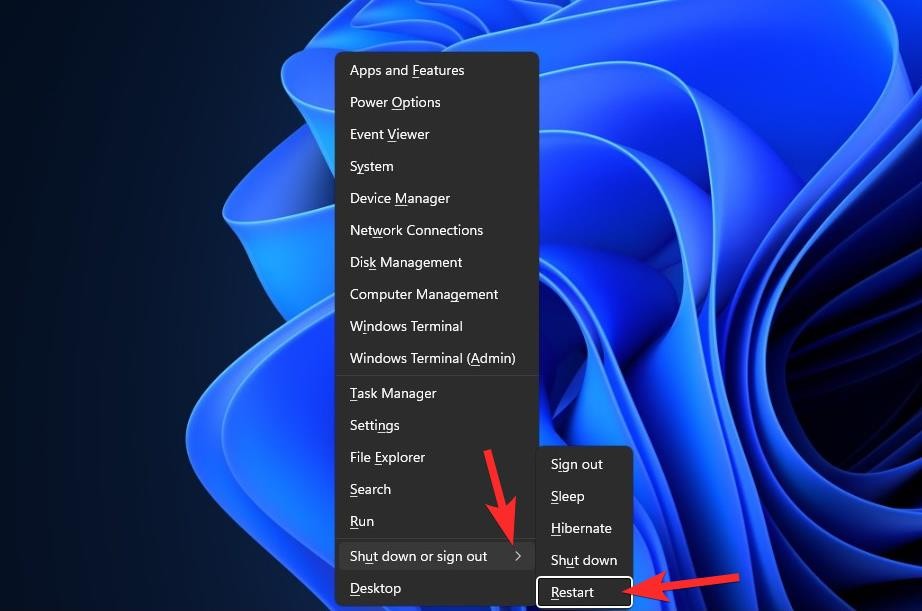
Before trying anything fancy, you should try simpler measures, such as restarting your PC or Windows Explorer (see below). Doing so will give the system a soft reset, allow data to be reloaded, and possibly fix errors with the Taskbar and Start Menu.
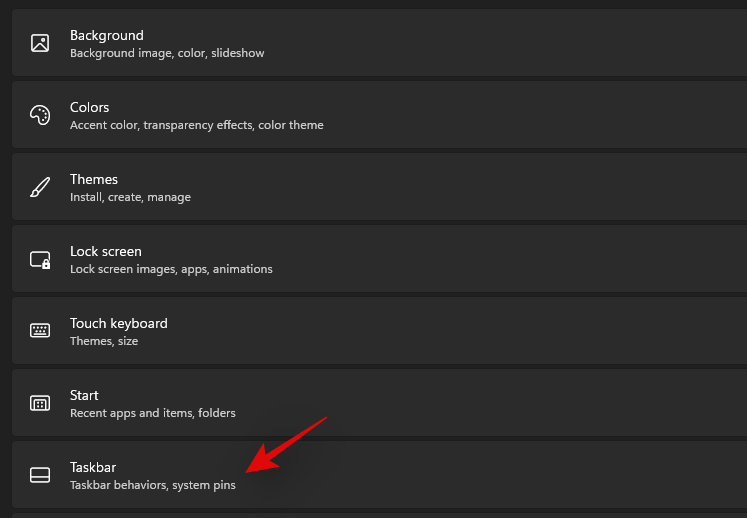
2. Make sure ‘Automatically hide the taskbar’ is disabled
Press Windows + ion the keyboard and click ‘Personalization’ on the left.
Click ‘Taskbar’.
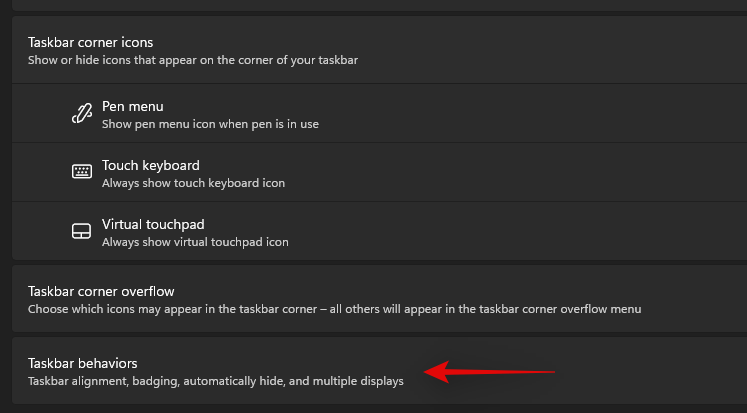
Uncheck the ‘Automatically hide the taskbar’ box.
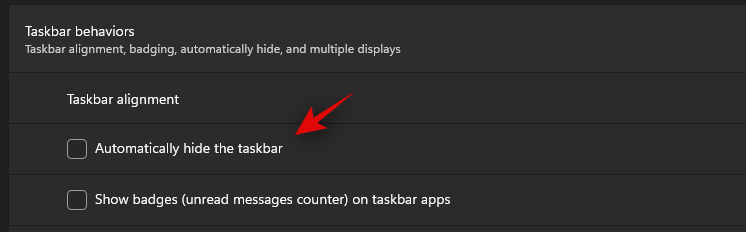
Now close the Settings app and if the Taskbar was being hidden automatically, it should now be disabled on the system.
3. Restart required services
As mentioned earlier, Windows 11 has improved the Taskbar, this means that the Taskbar relies on many services to work properly on any system. Please restart all these services to ensure that background conflicts do not prevent the Taskbar from working properly on the system.
Click Ctrl + Shift + Escon the system to launch Task manager. Switch to the ‘Details’ tab at the top.
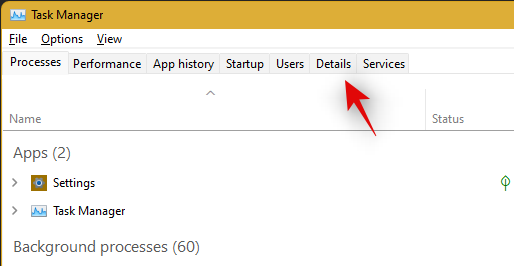
Now find the following running services and select them by clicking on them. Press ‘Delete’ on the keyboard and confirm the selection by selecting ‘End process’.
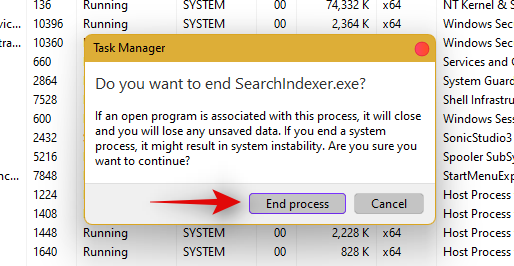
- Explorer.exe
- ShellExperienceHost.exe
- SearchIndexer.exe
- SearchHost.exe
- RuntimeBroker.exe
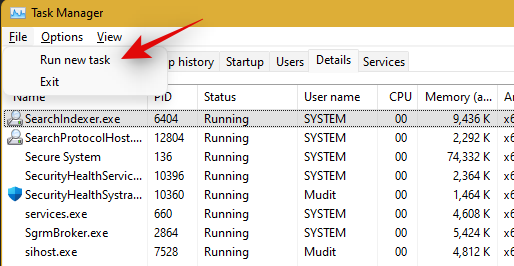
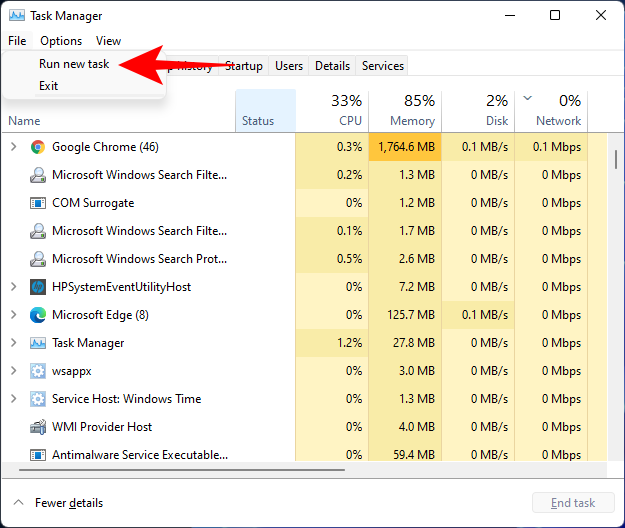
Please restart Windows Explorer now. Click ‘File’ in the top left corner and select ‘ Run new task ‘.
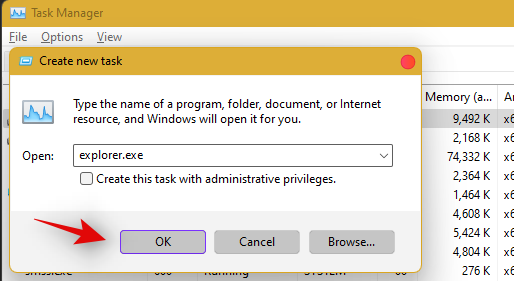
Type ‘explorer.exe’ and press Enter on the keyboard. You can also click ‘Ok’ if needed.
After explorer is restarted, just restart the PC to restart other services on the system.
The taskbar will now be restored if background service conflicts are the cause of the problem.
4. Delete IrisService in Registry and Restart
Click Ctrl + Shift + Escto open Task manager. Then click File in the top left corner.
Select Run new task.
Type cmd and press Enter.
This will open an enhanced instance of Command Prompt. Now copy the following command and paste it into the Command Prompt:
reg delete HKCU\SOFTWARE\Microsoft\Windows\CurrentVersion\IrisService /f && shutdown -r -t 0

Then press Enter. As soon as you do so, the PC will restart. After starting the backup, everything should be back to normal, including the Taskbar.
5. Add UndockingDisabled in Registry
Click Ctrl + Shift + Escto open Task manager. Then click File (top left corner) and Run a new task .
Type regedit and press Enter.
This will open the Windows Registry Editing Software. Now navigate to the following address:
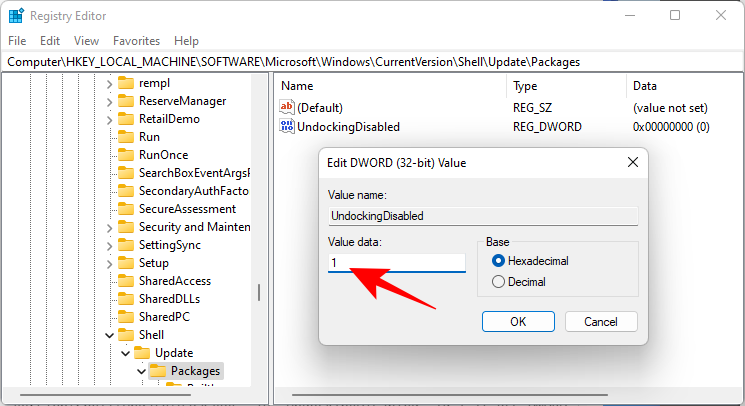
Computer\HKEY_LOCAL_MACHINE\SOFTWARE\Microsoft\Windows\CurrentVersion\Shell\Update\Packages
Alternatively, just copy the above and paste it into the Registry Editor’s address bar.
After pressing Enter, you will be redirected to the specified key. On the right, right-click on a space and select New > DWORD (32-bit).
Name this newly created DWORD UndockingDisabled.
Then double click on it and change “Value data” to 1. Then click OK.

Restart the PC for the changes to take effect.
6. Run SFC & DISM commands
Press Start, type cmd and click Run as administrator.
Now type the following command:
sfc /scannow
Press the Enter button. Wait for SFC to complete the scan and fix any problems found.
Next, run the following DISM command for the Deployment Image Servicing and Management tool:
dism /online /cleanup-image /scanhealth
Then press Enter. Again, wait for the scan to complete.
Now, run the following DISM command:
dism /online /cleanup-image /restorehealth
Press the Enter button. Wait for DISM to restore health.
Finally, run the chkdsk command to run the Check Disk utility:
chkdsk c: /r
Press the Enter button. The Command Prompt will give you a message telling you that it “cannot lock current drive… because the volume is in use by another process” and ask for your permission to schedule a scan before the next boot. Tap Yto comply.
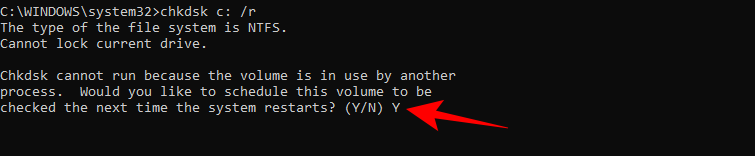
And press Enter. Now restart the computer, let the Check Disk tool do its work and check if the Taskbar is back to normal.
7. Reinstall UWP
Press Ctrl + Shift + Escon the keyboard to launch the Task manager. Click ‘File’ and select ‘ Run new task ‘.
Type ‘PowerShell’ and press Ctrl + Shift + Enteron the keyboard.
PowerShell will now be launched as administrator on the system. Enter the following command:
Get-AppxPackage -AllUsers | Foreach {Add-AppxPackage -DisableDevelopmentMode -Register “$ ($ _. InstallLocation) \ AppXManifest.xml”}
Press the Enter button. PowerShell will display a running message list in red. But don’t worry about it. Just wait for the command to finish executing.

8. Check UAC and add Registry tweaks if needed
UAC is a must-have for all modern apps and features including Start Menu and Taskbar. You should first enable UAC if it is disabled and reboot the system. If the Taskbar is still not working for you, then we suggest that you try adding the Xaml Start menu value to your Registry Editor.
Adding this value seems to restart and re-register the Taskbar services, which seems to get the Taskbar working again on most systems. Follow the instructions below to get you started.
Check and enable UAC if disabled
Press Ctrl + Shift + Escon the keyboard to launch task manager. Now click on ‘File’ in the top left corner of the screen and select ‘Run new task‘.
Type ‘cmd’ and press Ctrl + Shift + Enteron the keyboard.
Now type the following command and press Enter to execute the command.
C:\Windows\System32\cmd.exe /k %windir%\System32\reg.exe ADD HKLM\SOFTWARE\Microsoft\Windows\CurrentVersion\Policies\System /v EnableLUA /t REG_DWORD /d 0 /f
UAC will now be enabled for the system. Restart the PC for the changes to take effect on the system. After the reboot, the Taskbar should be up and running on the system if UAC is an issue for you. If not, use the instructions below to enable the Taskbar function on the system.
Click Ctrl + Shift + Escto launch task manager. Now click on ‘File’ in the top left corner and select ‘ Run new task ‘.
Type ‘cmd’ and press Ctrl + Shift + Enteron the keyboard.
Now type the following command and press Enter on the keyboard.
REG ADD "HKCU\Software\Microsoft\Windows\CurrentVersion\Explorer\Advanced" /V EnableXamlStartMenu /T REG_DWORD /D 1 /F
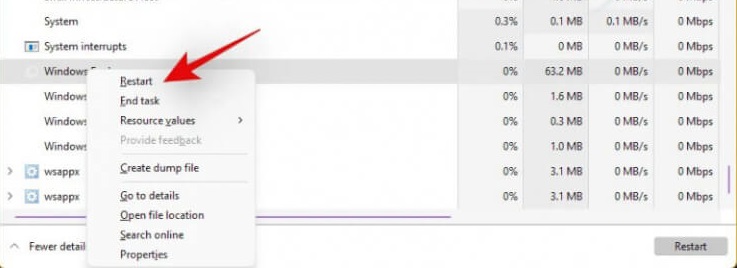
Go back to task manager now, find Windows Explorer in the list and right click on it. Select Restart to restart explorer.exe.
After the reboot, try accessing the Taskbar. The taskbar should now be available on the system.
9. Edit date and time to fix Taskbar
Date and Time settings seem to be the main cause of Taskbar problems in Windows 11. Use the guide below to try the following time fixes to see which works best for you.
Make sure that the time is correctly synchronized with the time server
Press Ctrl + Shift + Escon the keyboard and click ‘File’. Select ‘ Run new task ‘.
Type ‘Control’ and press Enter on the keyboard.
Click ‘Date and Time’.
Select ‘Internet Time’ from the top.
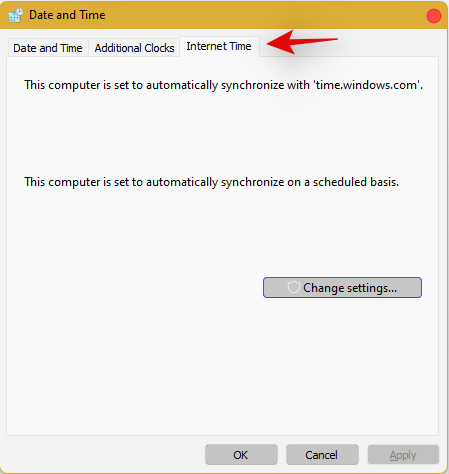
Click ‘Change settings’.
Uncheck the ‘Sync with Internet time server’ box.
Click ‘Ok’ when you are done.
Restart the PC at this point and check the Taskbar. If it’s still disabled, don’t worry, follow the steps above and re-enable Sync with Internet Time Servers.
Once enabled, press Ctrl + Shift + Escon your keyboard and find Windows Explorer in the list on the desktop. Right click on the list and select ‘Restart’.
After the explorer restarts, try using the Taskbar. If syncing was the problem, it should be fixed on the system by now. If not, continue with the other timing fixes mentioned below.
Change date to 1 day before
Open Task manager by pressing Ctrl + Shift + Escsimultaneously. Then click File .
Clic Run new task.
Type Control Panel and press Enter.
Now click on Clock and Region.
Under “Date and Time,” click Set date and time .
Click the Internet Time tab to switch to that tab.
Click Change settings…
Uncheck Synchronize with Internet time servers, and then click OK.
Now click on the Date and Time tab to switch back to it.
Here, click Change date and time…
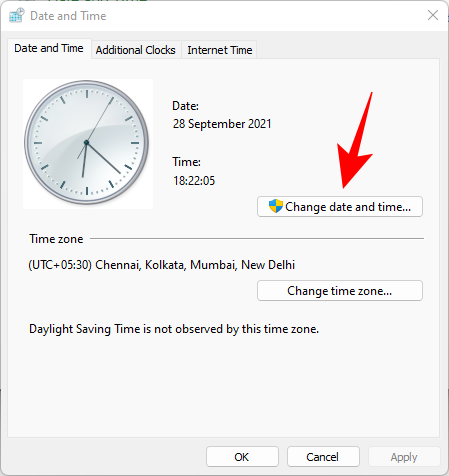
Now change the date and time to reflect tomorrow. As of this writing, it’s November 1st, so we’ll change the date to November 2nd.
Change Date of last cumulative updates
If you still can’t get the Taskbar to work then you will have to go through a few hoops to change your date and time multiple times and get the Taskbar to work on the system. Follow the instructions below to get you started.
Press Ctrl + Shift + Escon the keyboard, click ‘File’ and select ‘ Run new task ‘.
Type ‘Control’ and press Enter on the keyboard.
Select ‘Date and Time’.
Switch to ‘Internet time’.
Click ‘Change Settings’.
Uncheck the ‘Sync with Internet Time Server’ box.
Click ‘Ok’.
Switch back to ‘Date and Time’. Click ‘Change date and time’ and select the date as September 2nd.
Close all windows and restart the system. After the reboot, open the ‘Date and Time’ dialog again and change the date to October 7 this time. Reboot the system and the Taskbar should now be backed up and running again on the system. Now you can enable sync again using the steps above on your system.
If the synchronization period does not work, delay one month in advance to restore the Taskbar
If you still can’t get the Taskbar up and running again on your system, you can try fixing the last date change error. We recommend using the steps above to change the date and time to one month before the current date. After the change, reboot the system and the Taskbar should be up and running on the system now.
The downside of this fix is that if you revert to a normal date, the Taskbar will stop working on the system. Having mismatched dates can cause background sync issues for different apps and cause some websites to misbehave. You will also have problems installing and getting the latest Windows Updates, so you will need to check all of these manually when updating in the future.
10. Uninstall the latest Windows update ie: KB5006050
The cumulative update released in September for Windows 11 also seems to cause problems with the Taskbar on some desktops and laptops. Use the instructions below to uninstall the required update from the system.
Click Windows + iand select Windows Update from the left.
Click ‘Update History’.
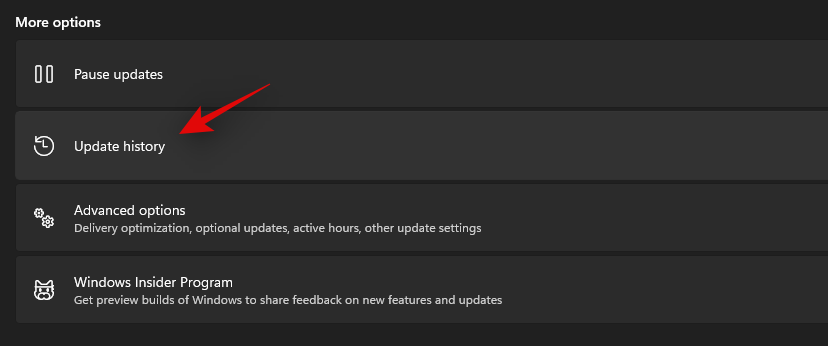
Now select ‘Uninstall updates’.
Click and select Windows Update KB5006746 from the list.
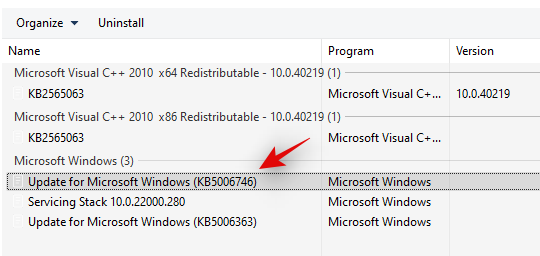
Now click ‘Uninstall’ at the top and confirm the choice to uninstall the selected update.
Reboot the system and the Taskbar functionality should now be restored on the system.
11. Restore PC to a previous restore point
If the Taskbar was active at a previous point in time, we recommend that you restore your PC to a previously available restore point on the system. Follow the instructions below to get you started.
Press Ctrl + Shift + Escon the keyboard and click ‘File’. Select ‘ Run new task ‘ once you are done.
Type CMD and press Ctrl + Shift + Enter on the keyboard.
Now type ‘rstrui.exe’ and press Enter on the keyboard.
The system restore utility will now launch on the system. Click ‘Next’.
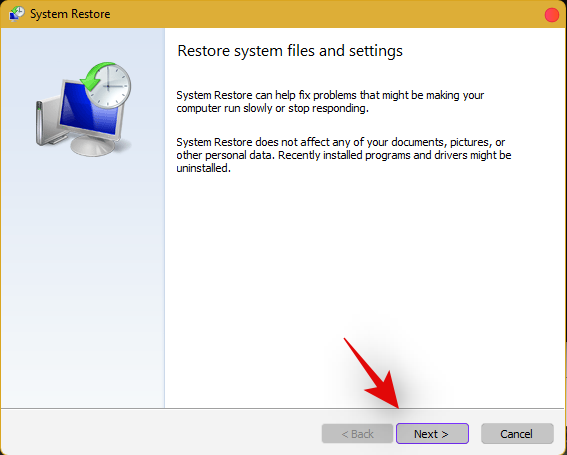
Select the desired restore point from the list on the screen. Click ‘Next’ when you are done.
Tip: Click ‘Scan for affected programs’ to see a list of installed programs that will be removed from the system during the recovery process.
Click ‘Finish’ once the restore is finished and reboot the system.
The taskbar will now be backed up and running again on the system.
12. Create a new local admin account and transfer all data
If the Taskbar is still not working for you up to this point, it’s time to take some drastic measures. You can create a new local admin account, check if the Taskbar works there, then move all the data to the new account. It will be a tedious process but it is the next best way to get the Taskbar working on the system without resetting the PC. Follow the instructions below to get you started.
Create a new local admin account
Herre is how you can create a new local admin account on your system.
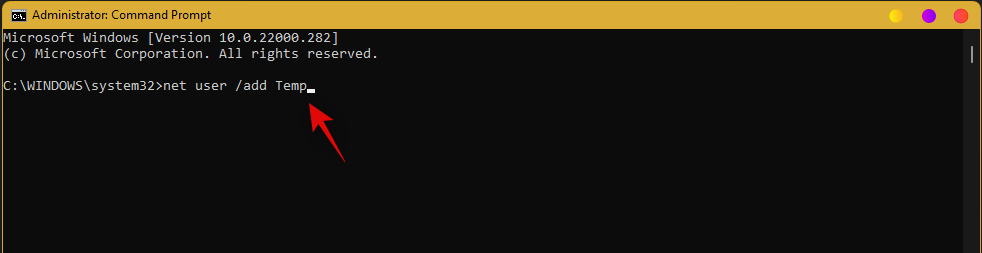
Note: Most users experiencing Taskbar issues also cannot access the Settings app. Therefore, we will use CMD to add a new local admin account to the PC. However, if the Settings app is available to you, you can also use it to add new accounts.
Press Ctrl + Shift + Escon the keyboard, click ‘File’ and select ‘Run new task‘.
Type ‘cmd’ and press Ctrl + Shift + Enteron the keyboard.
CMD will now be launched as administrator. Use below command to add new local admin account. Replace NAME with the Username of your choice for the new account. You can add a password after you have confirmed that the Taskbar is available in the new account.
net user /add name
Once you have added the new user, use the command below to convert that user into an administrator account on the PC. As always, replace NAME with the Username for the new account you created earlier.
net localgroup Administrators NAME /add
Now enter the following to sign out of the current account.
logoff
After logging out, click on the newly added account to log in the same. After logging in, check if the Taskbar is available in the new account. If that’s the case, you can use the next section to transfer all your data. However, if the Taskbar is still missing then you have no choice but to perform a fresh install of Windows 11 on your PC from a removable media USB drive.
Transfer all data
Press Windows + ion the keyboard and click ‘About’ on the right.
Click on ‘Advanced system settings’.
Click on ‘Settings’ under ‘User Profiles’.
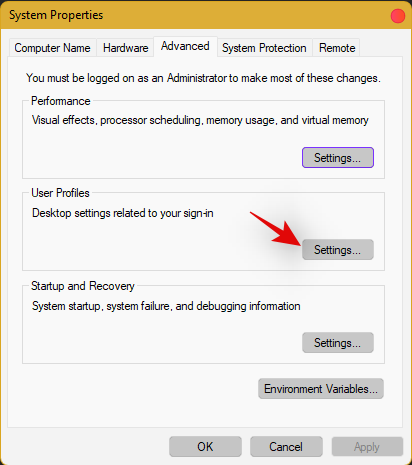
Select the original profile by clicking on it and selecting ‘Copy To…’.
Now enter the following path in ‘Copy profile to”. Rename NAME to the username of the previous profile from where you want to copy all your data.
C:\Users\NAME
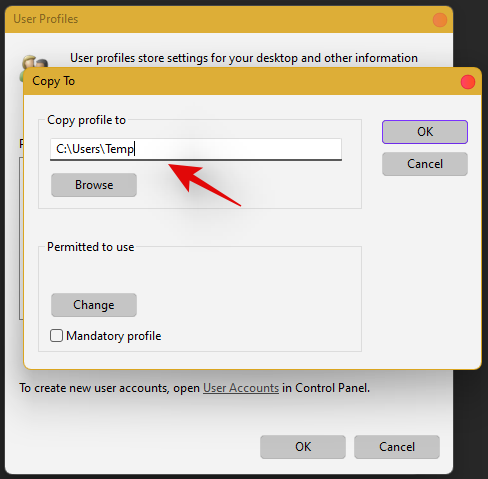
Click ‘Change’.
Type a name for the new user profile and press Enter on the keyboard.
Click ‘Ok’ when you are done.
All data will now be copied to the new profile where the Taskbar works on the PC. You can now delete your previous user account and set a password for your new account.
We hope this article helps you! Visit Macwintips.com to update the most practical and useful tips for Mac and Windows.