How to merge layers in photoshop on Mac without flattening. Merge layers or combining layers in Photoshop is an extremely simple operation, but not everyone knows, especially how to merge layers into a new layer without deleting the old layer, the fewer people know. So Theartcult will guide you on how to merge layers in Photoshop including Merging two layers, merging multiple layers into one, merging all layers in Photoshop, and still keeping the old layers.

What is layer merge? How to merge layers in Photoshop
Merge Layer is the operation of merging 2 or more overlapping layers into a single layer.
When working in PTS where you have created too many layers, in addition to grouping them into a Group, layer merging is also a quick method, moreover, when merging layers will delete old layers (all layers below) That reduce the image file size to help low-profile machines “breathe” more.
To merge layers in Photoshop, you just need to select the layers you want to merge and then press Ctrl + E on the keyboard or right-click and select Merge Layers. If you select only 1 layer, the above operation will merge that layer with the closest layer below.
What is image flattening? How to flatten in Photoshop
Flattening Image is to combine “all” existing layers in the working file into a single layer, so it also deletes all remaining layers (all but the top layer) in the PTS.
This concept, most PTS users in Vietnam refer to collectively as “combining layers” or “combining all / merging all layers”, these are all layering operations, just different from merging a few layers or merging. only the whole.
The special feature of merging “all” layers is to make the image really “flat” if we put the layer on any “plane”, ie after merging (flattening) there is only one left. layer containing the image (top layer).
Although flattening an image and merging layers both work quite similarly, to flatten an image you have to do something different:
Press Ctrl + Shift + E (Win) / Cmd + Shift + E (Mac) on your keyboard or right-click any layer and select Flattening Image.
Compared to the normal “layer merge”, you do not need to select the layers to merge, just select any layer and then flatten the image and the entire layer will merge into a single layer.
Why shouldn’t images be flattened in Photoshop?
In the previous part we showed you how to combine layers and flatten images. Those are very quick and simple operations, but sometimes that ease will interrupt your work, we will give some practical examples as follows:
I am using Photoshop CC 2020 but you can follow with any recent version.
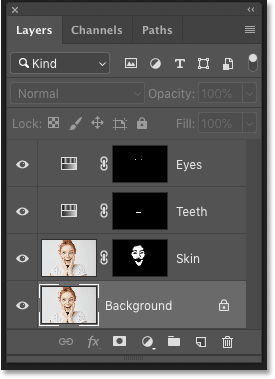
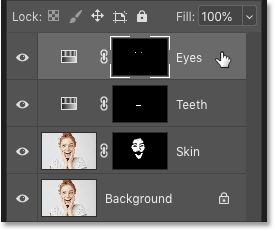
1. In the Layers panel, I added some layers to the working file along with the original image on the Background layer. Specifically a layer to smooth the skin, above is a layer to whiten teeth and on top is a layer to change eye color:
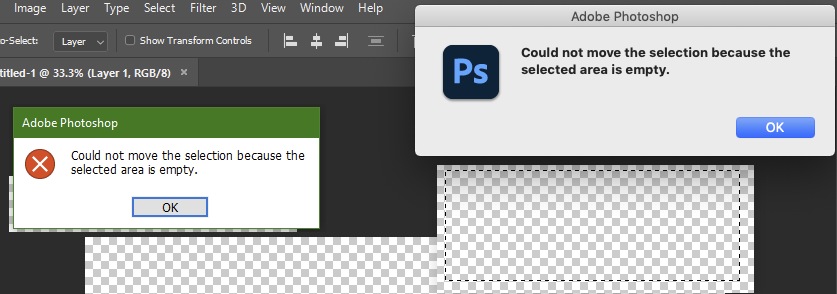
2. If I’m done with the image, I can print it, email it, or upload it to the web. But first, I want to sharpen the image, to do this, I have to merge all the layers into a single layer (flatten the image) leading to the following problem.
Problem with image flattening
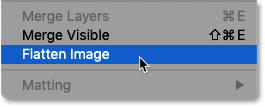
1. A quick way to merge entire layers in Photoshop is to simply “flatten the image”: Select Layer in the menu bar and click Flatten Image.
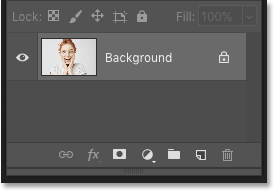
2. By flattening the image, I “lost all the remaining layers”. If I save and close the working file right now, the layers will be permanently deleted, resulting in not being able to edit any of those old layers in the future:
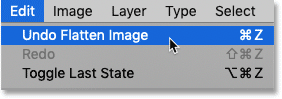
3. I will undo that and restore the layers by choosing Edit -> Undo Flatten Image (or press Ctrl + Z (Win) / Command + Z (Mac):
How to merge layers in photoshop on Mac without flattening
This is a better way to work. Instead of flattening the image and “deleting all old layers” we can keep them and simply merge their copy into a whole new layer.
Step 1: Select the top layer in the Layers panel
Whenever we add a new layer, Photoshop will place it right above the currently selected layer. So you will most likely want the merged copy to appear above the existing layers, start by selecting the top layer in the Layers panel:
Step 2: Merge the entire layer into a new layer (do not lose the old layer)
Then use the “secret” shortcut to merge the entire layer into a new layer without having to delete them.
On a Windows computer: press Shift + Ctrl + Alt + E.
On a Mac: press Shift + Command + Option + E.
It’s basically pressing all three modifier keys plus the letter E.
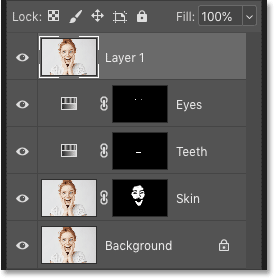
Take a look at the Layers panel, we should now see a brand new layer above the original layers. This new layer is the merged copy of all the other layers in the working file:
Step 3: Rename the new layer “Merged”
You can do this step or not, we’ve done the layering in Photoshop without flattening the image, so it’s basically done.
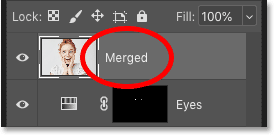
To rename this new layer, double click on the existing name (in my case “Layer 1”), rename the layer “Merged” then press Enter (Win) / Return (Mac) on your keyboard To accept:
It’s an easy way to avoid image flattening by merging your layers into a new layer in Photoshop. Don’t forget to share the article with your friends and colleagues to improve your working skills with Photoshop software!
Theartcult hopes that this article has helped you to merge layers in Photoshop on Mac without flattening. If you have any questions or suggestions on this topic, don’t hesitate to leave us a comment below. Thanks for reading!
Visit Macwintips.com to update the most practical and useful tips for Mac and Windows!