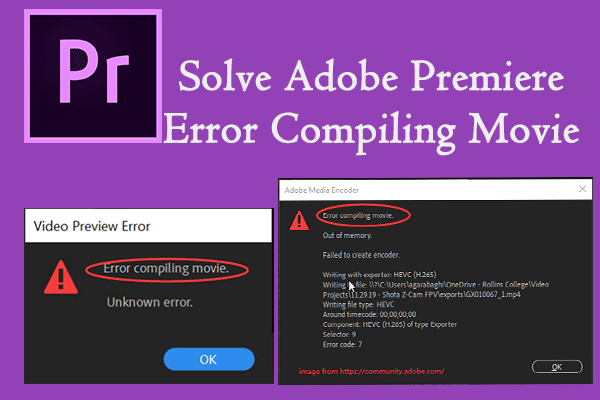
Error compiling movie in Adobe Premiere 2022. Movie compilation errors are one of the most common problems when it comes to Adobe Premiere. It is reported to appear on Windows and Mac OS when performing various operations in Premiere Pro. Some users are saying that they have this error when trying to output sequence audio, while others are saying that it only appears to be related to clips from a locator. Code as not tool could be for a Windows version because it is it being reported on Windows 7, Windows 8.1 and Windows 10. In this article, Theartcult will show you how to fix this error.
What causes ‘Movie compilation error’ in Adobe Premiere Pro?
We investigated this particular issue by looking at various user reports and the most successful repair strategies when it comes to this scenario. As it turns out, there are several different situations in which this particular problem would occur:
- Adobe Premiere Is Outdated – According to various reports. This error is commonly reported with outdated Premiere builds. Adobe has done a great job of patching a lot of work that previously caused instability. If this scenario applies, you should be able to resolve the issue by updating to the latest software version.
- GPU can’t handle the load – If you’re on low to medium GPU usage, you’ll most likely get this error while trying to render or export large files. If this scenario is applicable, you might be able to work around the issue by using the Software Only Playback Tool.
- Corrupt Project Location – This error is also associated with cases where the project location contains corrupted files or exceeds the character limit. Some users also facing this issue reported that the problem was resolved after the project location was changed.
- Project issue – If the problem occurs when you are trying to export a file after a period of inactivity, you can work around it by duplicating the project, creating a new project and re-importing the content, or by how to discover which part is screwing up the export and exclude it from the process.
If you are currently struggling to solve this exact problem, this article will give you some troubleshooting steps that will eventually help you resolve the issue. Below you will find a collection of methods that have been confirmed to work by at least one user affected by the same issue.
How to fix Error compiling movie in Adobe Premiere 2022
For best results, we recommend following the methods in the order that we can cover them. In the end, one of the tips will deal with the problems in any of its allocations.
Method 1: Update Premiere to the latest version
If the problem is caused by a bug, it will most likely be resolved if you update the software to the latest version available. Adobe has done a great job of patching a lot of inconsistencies with Windows 10 lately, so updating might be the only fix you need to apply.
Some affected users reported that the issue was resolved after they updated to the latest version available and restarted their devices.
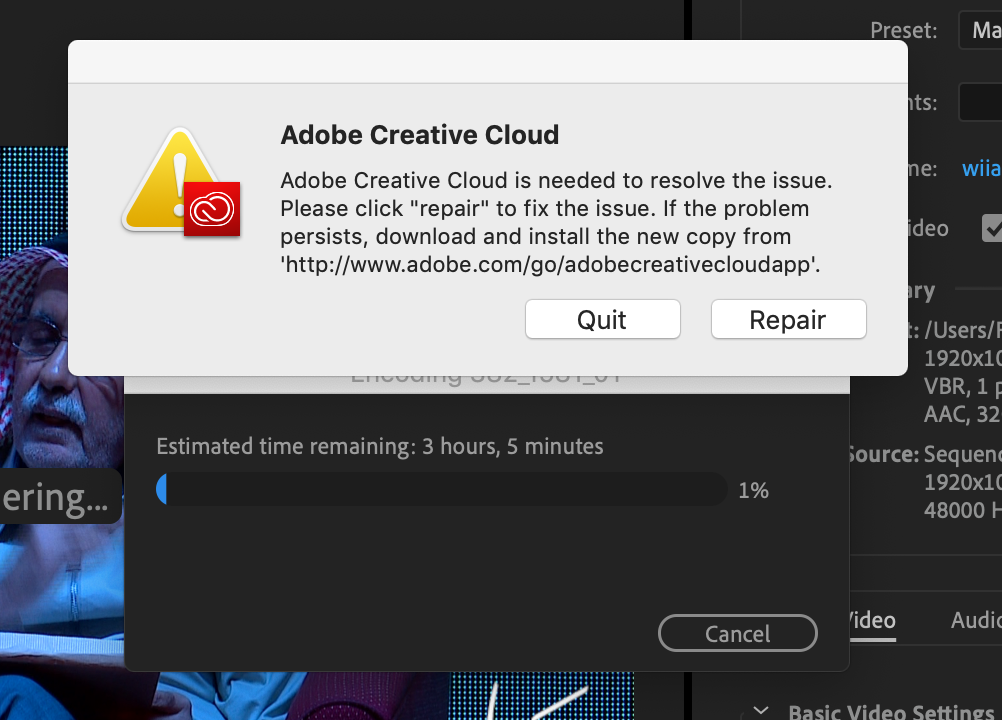
By far the easiest way to update Adobe Premiere to the latest version is to use Adobe Creative Cloud . With just a few clicks you will be able to update your software to the latest release.
To check for Adobe Premiere updates, open the Creative Cloud desktop app and click the action button (upper-right corner of the screen). Then from the new menu that appears, click Check for App Updates .
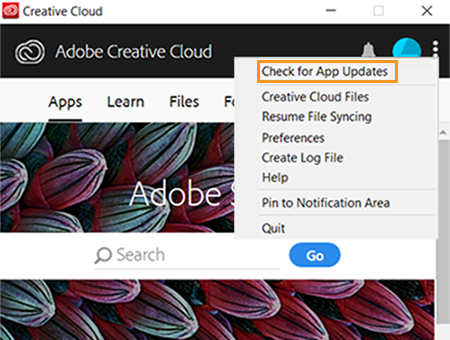
Then, follow the onscreen prompts to update Adobe Premiere to the latest version. If you are prompted to choose from a collection of different versions, select the latest version then follow the installation instructions.
If you’re not using Creative cloud, follow the instructions below to manually uninstall Adobe Premiere and then reinstall the latest version:
- Press Windows key + R to open the Run dialog box . Next, type in appwiz.cpl, in the Run box and press Enter to open the Programs and Features window .
- Once you’re in the Programs and Features list, scroll down the list of apps until you find Adobe Premiere Pro. When you see it, right-click on it and select Uninstall to initiate the uninstallation process.
- Follow the onscreen instructions to complete the uninstallation process.
- Once the app is uninstalled, restart your computer.
- On the next boot sequence, download the latest version.
- Once the download is complete, open the executable and install the app. Once the installation sequence is complete, activate your download by inserting your license key.
- Perform the same action that previously triggered the ‘Movie Compilation Error’ and see if the problem is resolved.
If this method does not allow you to solve the problem, skip to the next method below.
Method 2: Change Video Renderer
If you get this error every time you try to render the video, you can solve the problem by changing the video rendering method. This is more of a workaround than a proper fix, but a lot of affected users reported that it was effective in resolving the ‘Movie Compilation Error’.
As it turns out, there are some commonly reported stability issues with certain configurations while the renderer is configured to use GPU Acceleration (CUDA) .
Here’s a quick guide on how to resolve this by going to your Project Settings and changing the Default Video Render and Playback preferences :
- In the video that is causing the error, click File from the ribbon menu in the top left part of the screen. Then from the File menu, go to Project Settings and click General.
General preferences in Adobe Premiere Pro - Once you are in the Project Settings window , make sure the General tab is selected. Then go to Video Render and Playback and make sure that Mercury playback engine software only is selected. You can do this using the drop-down menu.

Mercury playback engine software only is selected Note: Using Mercury Playback Engine’s GPU Acceleration is known to cause some stability issues on certain PC configurations.
- Try to re-render your video and see if the problem is resolved. If you are prompted by the Change window, click Keep Preview .
- Using the ribbon at the top, go to Export and click Export again to complete the operation.
If you are still having the same problem, move on to the next method below.
Method 3: Change the location of the project file
Some affected users reported that the issue was resolved after they changed the location of the project file. In most cases, affected users reported that they got it working by changing the location of both the Project file and the exported video to the Desktop.
Here’s a quick guide on how to do this:
- Once your project is ready, go to File (from the top left part of the ribbon menu) and click Save As.
- From the Save As screen , set the location to the desktop and name your video project before clicking Save.
- Next, go to Export Settings , select the output tab and click Export.
- See if the procedure is successful and completes without errors.
If this method does not help you to solve the problem, move on to the next method below.
Method 4: Copy Sequence
Some users have reported that copying the string is in the process of being exported allowing them to complete the operation without seeing ‘Movie compilation error’. As it turns out, this has the potential to circumvent the error message and allow you to output it without problems.
To duplicate a sequence, simply right-click on the project that is failing and select Export from the new context menu that appears.
After you do this, try to do the same action that previously triggered the ‘Movie compilation error’ and see if the problem is resolved. If the same error message appears, move down to the next potential fix.
Method 5: Find out where the export crashed
If Adobe Premiere is crashing somewhere during the export, that probably means something is happening at the top of the sequence. A few users with this problem managed to complete the export without error by either framing it back a few frames or a few frames forward from the menu at the bottom of the screen.
After moving the frame, export that small segment and see if the ‘Movie compilation error’ error occurs. If the export no longer fails, then you should export the rest of the file.
If the problem is still not resolved, skip to the next method below.
Method 6: Create a new project
Some users also getting this error tried to fix it by creating a new project with the same file and doing the export from the new one. To do this, go to File > New > Project . Then name the project whatever you want and press Ok .
When the new project is created, import the previous project. You can just drag and drop or you can use the Import Wizard . After you confirm the import and the process is successful, see if the ‘Movie compilation error’ error has been resolved.
Error Code 3, Movie Compilation Error, Premiere Pro Export Error
When you can’t render video in H264 format see Error Code 3, Movie Compilation Error, Export Error, Render Completion Error on Premiere Pro, follow the fixes below.
Disable hardware encryption Set power management mode to MaximumUpdate Graphics driverUpdate Premiere Pro
Let’s learn the details of each method.
1] Disable hardware encryption option
Here is a fix that worked for me personally. You need to disable Hardware encryption. To turn them off,
Open Premiere Pro Click Edit in the Menu bar and hover over Options at the bottom of the list Then select Media in options Check the buttons next to H264/HEVC hardware accelerated decoding (requires restart ) and H264/HEVC Hardware Accelerated Encoding (reboot required) Click OK and close Premiere ProT then restart your PC
Check if the fix helped you fix the problem.
2] Set Power management mode to Maximum
You need to set the power management on your GPU to maximum to fix the problem. You can do that through the NVIDIA Control Panel or AMD Radeon Software on your PC. If you are an NVIDIA user,
Right click on the desktop Click Show more options Select NVIDIA Control Panel in the context menu Click Manage 3D Settings Find Power Management Mode in Settings and set it to prefer optimal performance multi by drop-down menu.
3] Update the graphics driver
Some users experience this error due to outdated graphics drivers. You need to update the graphics driver on your PC and fix the problem.
You can update the graphics driver,
4] Update Premiere Pro
Check to see if there are any updates available for Premiere Pro. Open the Adobe App Updater on your PC and click the Update button next to Premiere Pro. It will automatically check for updates, download and install them.
How to fix error code 3 in Premiere?
Error Code 3 in Premiere Pro can be easily fixed by disabling optional hardware acceleration, updating graphics drivers, updating pro version, and setting power management to maximum.
How to enable hardware encryption in Premiere Pro?
To enable encryption hardware acceleration in Premiere Pro, click Edit in Premiere Pro’s menu bar, hover over Preferences, and select Media. Then check the button next to H264/HEVC hardware accelerated encoding (restart required). Then restart your PC.
Theartcult hopes that this article has helped you. If you have any questions or suggestions on this topic, don’t hesitate to leave us a comment below. Thanks for reading!
Visit Macwintips.com to update the most practical and useful tips for Mac and Windows!