How to Change iPhone DNS server. There are many DNS server instructions on the computer. In the face of the situation that the undersea fiber optic cable can be “bitten” by a shark at any time, in addition to changing DNS on your computer, you should also know how to change the DNS server on your iPhone/iPad.
How to Change DNS iPhone
When Android Pie was launched, many people praised the addition of the custom DNS feature. Many iOS users didn’t know that this option had been on their iPhone/iPad for a long time. The reason they might not know about it is that it doesn’t show up in the settings. You will understand why we say this shortly.
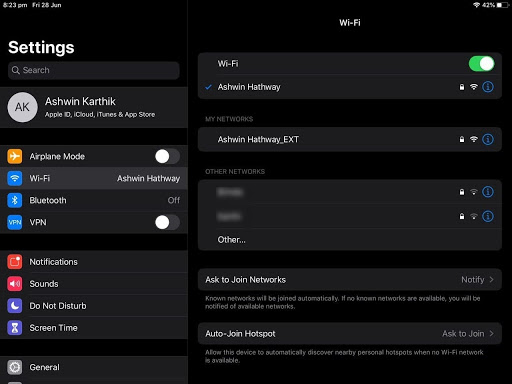
1. Open “Settings” on your iPhone or iPad
2. In the left sidebar, select “Wifi”.
3. Now, on the right pane, you will see the name of the Wi-Fi network you are connected to. It will have a green check mark next to it indicating that it is active.
4. Tap anywhere on the name of the Wi-Fi network in use or the icons on the side to open the settings specific to the selected network.
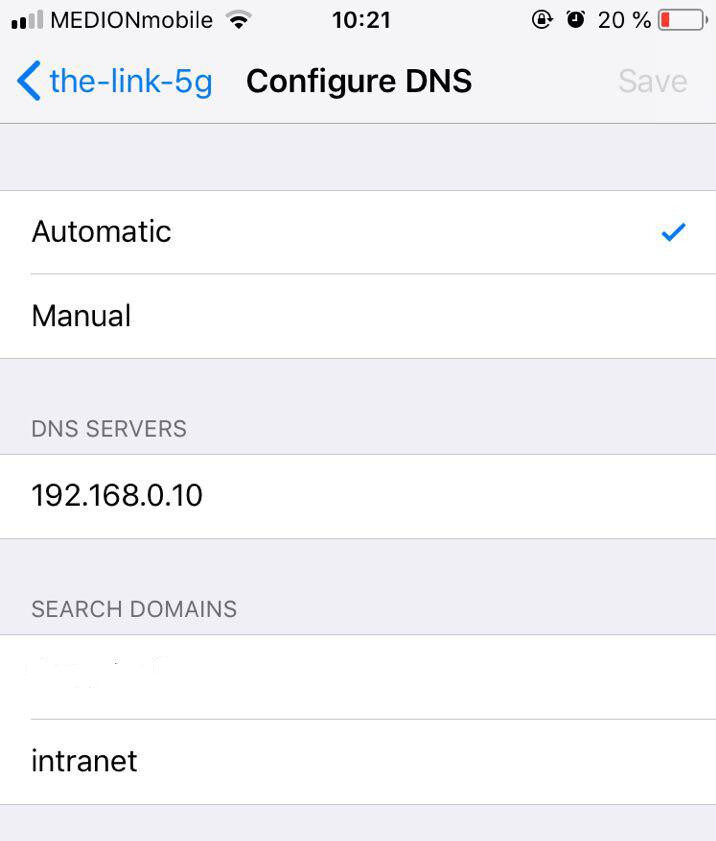
5. Scroll down to the “Configure DNS” option. If it is selecting Automatic, it means that no custom DNS has been set up and the network is connecting to your ISP’s DNS servers.
6. In the Configure DNS section, select the Manual option. You should now see an option “Add Server”.
7. Set any DNS you want. Don’t forget to hit the save button in the upper right corner, to finish adding the DNS server.
If you have multiple Wi-Fi networks, you’ll need to set up DNS for each.
Here are a few popular trusted public DNS services:
- CloudFlare DNS: 1.1.1.1 and 1.0.0.1 (Cloudflare also has DNS apps for Android and iOS.
- AdGuard DNS: 176.103.130.130 and 176.103.130.131
- OpenDNS: 208.67.222.222 and 208.67.220.220
- DNS Quad9: 9.9.9.9 and 149,112.112,112
- Google DNS : 8.8.8.8 and 8.8.4.4
AdGuard DNS is very useful, as it acts as a system-wide ad blocker.
Set up 1.1.1.1 – iOS
1.1.1.1: Faster Internet is the preferred method of setting up 1.1.1.1 DNS resolver and 1.1.1.1 for Families in iOS devices. It allows you to automatically configure your phone to use 1.1.1.1 on any network you connect to, and solves iOS inability of using an alternative DNS resolver in cellular connections.
The app also allows you to enable encryption for DNS queries or enable WARP mode , which keeps all your HTTP traffic private and secure, including your DNS queries to 1.1.1.1.
You can select between the options available in the app’s settings. By default, 1.1.1.1: Faster Internet is configured to WARP mode.
Set up 1.1.1.1: Faster Internet
- Download 1.1.1.1: Faster Internet from the App Store for free.
- Launch 1.1.1.1: Faster Internet and accept the Terms of Service.
- Install the VPN profile that allows your phone to connect securely to 1.1.1.1.
- Toggle the WARP button to Connected.
Enable 1.1.1.1 for Families
- Open 1.1.1.1: Faster Internet.
- Tap the menu button.
- Select Advanced > Connection options.
- In DNS settings > 1.1.1.1 for Families, select the option you want to use.
Configure 1.1.1.1 manually
Take note of any DNS addresses you might have set up, and save them in a safe place in case you need to use them later.
- Go to Settings > WiFi.
- Select the ‘i’ icon next to the WiFi network you are connected to.
- Scroll down and select Configure DNS.
- Change the configuration from Automatic to Manual.
- Select Add Server.
-
Depending on what you want to configure, choose one of the following DNS addresses for IPv4:
Use 1.1.1.1 resolver
1.1.1.1
1.0.0.1
Block malware with 1.1.1.1 for Families
1.1.1.2
1.0.0.2
Block malware and adult content with 1.1.1.1 for Families
1.1.1.3
1.0.0.3
Depending on what you want to configure, choose one of the following DNS addresses for IPv6:Use 1.1.1.1 resolver
2606:4700:4700::1111
2606:4700:4700::1001Block malware with 1.1.1.1 for Families
2606:4700:4700::1112
2606:4700:4700::1002
Block malware and adult content with 1.1.1.1 for Families
2606:4700:4700::1113
2606:4700:4700::1003
Select Save.
Summary of changing DNS Iphone
Personally, I don’t like Apple’s Settings (Apple’s Settings app) and the way the app presents options to change Iphone DNS. In comparison, on Android Pie, the DNS option is simple. You go to Settings > Network & Internet > Advanced > Private DNS. You only need to install it once and it works on all networks (Wi-Fi and Cellular).
Even if you don’t remember where the preference is, you can just open Settings on your Android device and enter DNS and it will show you the option. Do the same thing on iOS and you get nothing, it’s not a searchable option.
We hope this article helps you! Visit Macwintips.com to update the most practical and useful tips for Mac and Windows.


