Fix Premiere Pro not exporting video only audio. Adobe Premiere Pro has become an industry standard when it comes to video editing, but many users have reported that Adobe Premiere does not export videos only audio. This can be a big problem, so today we will show you how to fix it.
Fix Premiere Pro not exporting video only audio
Sometimes outdated Adobe Premiere software can also cause problems with video output. Meanwhile, temporary system glitches or background tasks or low storage space or corrupt media files or codec format and many other problems can be some of the reasons. Therefore, without knowing anything more, let’s take a look at the instructions below.
1. Check for Adobe Premiere Updates
You should check for Adobe Premiere updates as it can fix many bugs or errors and includes some features that may help you. You should also keep in mind that Adobe regularly updates the version of its software to make it better and more stable. While you will be able to check for updates from the software, you can visit the official Adobe Premiere page to download the latest version directly.
2. Restart your computer
Well, restarting your computer is a simple thing to do as a user. But it has a big impact on the system or applications to run properly if somehow anything is causing cache issues or glitches. Meanwhile, if your CPU or GPU is overheating or causing any problems with the system, a simple reboot will fix many problems in a jiffy.
3. Check enough free storage

It’s also possible that your computer’s storage is low enough and you don’t have enough free space left to export videos with higher file sizes. In that case, your Adobe Premiere software will not be able to export the video if the selected disc location is full. You can change the location to another disk partition with enough free space, or you can simply delete/move the file to free up some space.
4. Close background tasks
Make sure to go to Task Manager (Ctrl+Shift+Esc) and remove unnecessary CPU/Memory or higher using tasks from Processes section (if needed). Once you close all unnecessary or higher system resource consuming tasks from your Windows system, you’ll be able to easily run graphically intensive applications like Adobe Premiere in addition to exporting videos.
5. Try disabling security programs
Although it is not necessary to disable security programs on your Windows system, sometimes Windows Security or any third-party anti-virus program can cause many problems with heavy applications or its tasks. Be sure to temporarily disable your Windows security program’s real-time protection and check if the Adobe Premiere No Video Export issue still bothers you.
6. Change video display optimization
If none of the above methods work for you, try changing the video display optimization options on your computer. To do this:
- Launch Adobe Premiere or Premiere Pro whatever you use.
- Then go to Edit > Click on Preferences .
- Now you have to click on Optimize rendering for Selection.
- Select Memory and click OK to apply the changes.
- Finally, close the Adobe Premiere application and reopen it.
However, if this does not fix the problem, check the next method.
7. Allow Folder Permissions
You should also make sure that your selected video export folder location has sufficient admin rights. To do this:
- Go to the folder location where Adobe Premiere is located to export the video.
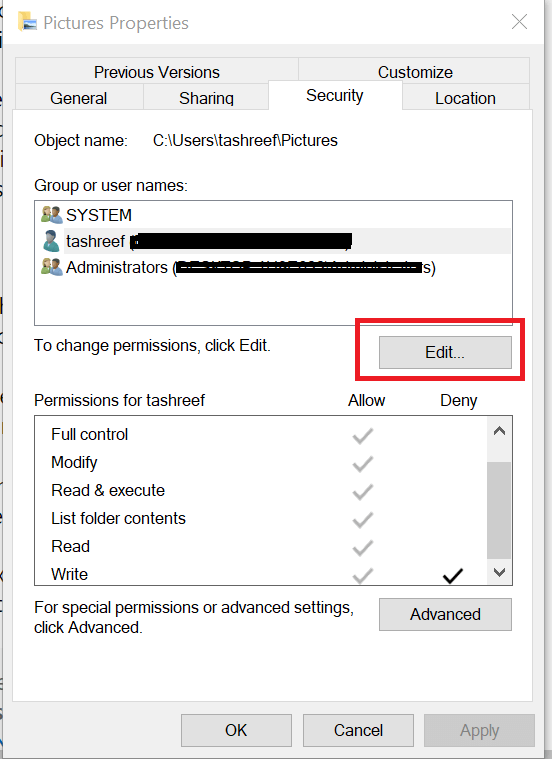
- Now, right-click on the folder > Click Properties.
- Go to Security tab > Click Edit.
- You have to check your username under Group or user names section. If not found, just click Add.
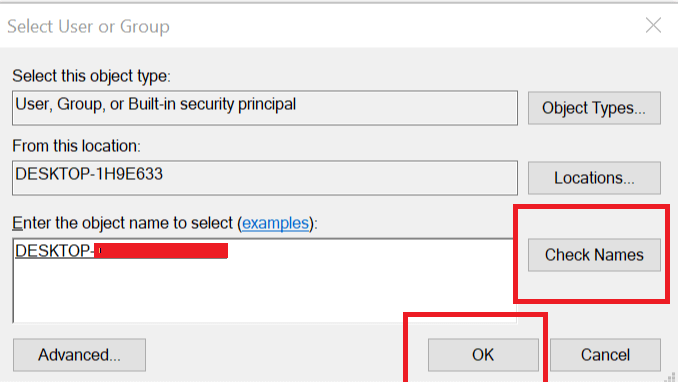
- Next you will have to enter your username > Click on Check Names.
- Finally, click OK to add the username.
- then enable checkbox for Full Control under Permissions for username section.
- Click Apply to save the changes and then click OK.
- Enjoy!
8. Change Codec Format
To recall, Adobe Premiere (Pro) uses the h.264 or MPEG codec format to render video. If there are any video compression errors, you may receive the following error message saying “Codec compression error. This codec may be unable to support the requested frame size, or there may be a hardware or memory problem error.” In that case, you can follow the steps below to fix the Adobe Premiere Not Exporting Video issue.
Format: H.264, Preset: HD 1080p, this is up to you, just exporting the H.264 file is ok, no problem!
- Launch the Adobe Premiere (Pro) application.
- Open up Export Settings.
- Because of Format : select the dropdown > Click QuickTime or None .
- Because Video Codec : Choose Photo – JPEG .
- Once done, try exporting the video.
9. Check media files before exporting
It’s highly likely that your project or video file is corrupted and that’s why Adobe Premiere doesn’t export the video. In that case you can turn off all the music and then export the video. Do the same for all tracks until you find the video export error. Once found, save the project with a different filename.
You can now remove the problematic part or frame from the video and try again to export it with a different name. This will be useful to you and display the video without any problems.
Video on Premiere Pro not exporting video only audio
Here are some solutions you can try if Adobe Premiere is not exporting the video. Be sure to try all of our solutions and let us know which one works for you in the comments.