Photoshop Tips and Tricks for Beginners. Photoshop always tops the list of top photo editing software. It provides users with almost all the tools to create and edit pictures. However, Photoshop can be “stun” to new users because it has many functions. In this article, we will introduce you 9 Photoshop Tips and Tricks for Beginners.

1. Move layers easily with the Control key
Usually, many Photoshop users will use the Move Tool to move layers. However, a much simpler and faster trick is to use the Control key. You just need to hold the Control key and click and drag on that layer with the mouse to easily move the layers as you like.
2. Open image file with double click
You may not know, just double-click on the gray background of the Photoshop window and you can open a new image file in a flash. This tip replaces opening an image file by choosing File > Open or pressing the traditional Control + O. Try it now!
3. Manage multiple layers easily with Layer Sets
Layer Sets allow you to organize layers into folders in case you have multiple layers in an image file for easy management. The way to do it is very simple, you click on the folder icon at the bottom of the Layers palette, then drag the layers to the top of a layer set, so you have put the layers into that layer set already.
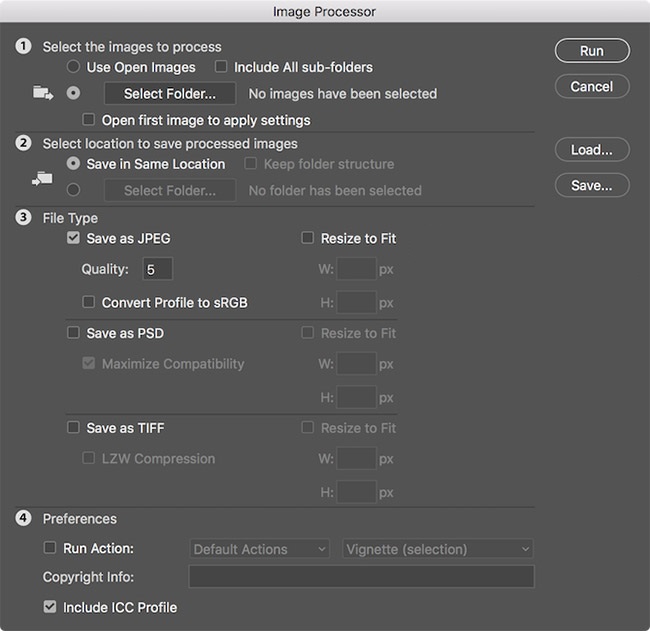
4. Resize multiple photos at once
Instead of resizing each image individually, you can use a script to resize multiple images at once. The way to do this is to choose File > Scripts > Image Processor. Then, choose the location to save the changed image on your computer as well as the file type (jpeg, PSD or TIFF) and the file quality. Next, you choose Resize to Fit to choose a specific width or height. Finally, click Run to complete the batch image resizing.
5. Change size – brush softness
Brushes in Photoshop are used for many different tools such as Brush (B), Clone Stamp, Healing Brush, Eraser… And in the process of use, changing the size as well as the soft hardness of the brush is very necessary. needed to make photo editing easier and more efficient. How to do it: Hold Alt + left click and drag left – right to change the brush size and drag up – down to change the soft hardness of the brush.
6. Hide all layers except one
For convenience, you can hide all layers and keep only a single layer by opening the Layers panel, then holding Alt/Option and clicking the show icon (eye) for layer you want to display. At this point, all other layers will be turned off except for the one you clicked.
7. Expand canvas with Crop
Crop is a familiar tool for cropping images. However, you can also use this tool to expand the canvas by dragging the corners outside the frame and pressing the Enter key to apply the changes.

8. Add watermark to multiple photos easily
To watermark multiple photos in no time, you can switch to the built-in brush. The way to do this is to go to Edit > Define Brush Preset and upload your watermark.
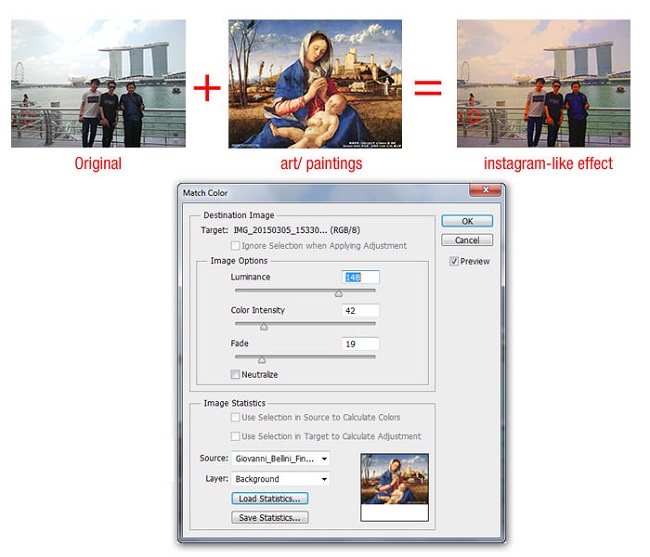
9. Create a simple color effect
Do you have a photo that is quite lackluster in color and want to change it to look more eye-catching but not too complicated? So, let’s immediately refer to how to create an extremely simple color effect as follows: Open the photo you want to edit, select Image > Adjustments > Match Color, then select the photo with the color palette you like. And click OK to see the changes. You can also adjust parameters in the Source section such as Luminance (color luminance) or Color Intensity (color intensity) to have a photo with more harmonious colors.
Hope these 9 Photoshop tips for beginners will help you. Wish you have satisfactory post-production photos.