How to fix file upload not working in chrome

How to fix file upload not working in chrome : Mac OS: can no longer upload any files in Chrome For some reason, I have disabled extensions as suggested. This does not work. I can’t upload files to google drive, can’t post a photo to Facebook, basically can’t upload files anywhere when using Chrome. Safari works fine. every few weeks,  Chrome stops allowing me to attach files by means of the “attachment/upload” buttons (i.e., in gmail, uploading photos on websites, etc.).

How to fix file upload not working in chrome

How to fix chrome file upload not working

System Preferences > Security & Privacy > Privacy Tab > Full Disk Access > Press the lock symbol to unlock [bottom right of window]> Select Chrome and add it. > Now restart Chrome.

FIX 1: Remove Chrome Permissions

  1. Click on the Apple menu on your Mac and select System Preferences.
  2. Then select Security & Privacy and click on Privacy.
  3. After that, select Files and Folders from the left menu bar.
  4. Then scroll to Chrome and uncheck the Downloads folder permission.
  5. Now launch Chrome on your macOS and check if the issue of being unable to upload files has been fixed or not.

FIX 2: Add Chrome to Full Disk Access

  1. Click on the Apple menu on your Mac and select System Preferences.
  2. Then select Security & Privacy and click on Privacy.
  3. After that, click on the Lock icon at the bottom left.
  4. Then select Full Disk Access, click +, and select Applications.
  5. Finally, add Google Chrome to this list.
  6. Now launch the browser and truly upload files, the issue would have been rectified.

Syndrome

When I want to upload a photo or attach something, I can click the paperclip or “add file” buttons, but it just doesn’t do anything; no error messages or anything – literally nothing happens. I tried looking this issue up in the community here, but nobody seems to have the exact same issue. I already tried resetting my browser to the default settings and it didn’t fix the problem. Incognito windows also give me the same issue.
 
This randomly happens on and off, and I’m not sure why; I never touch my settings, so I don’t understand why it would change. After 3 or 4 weeks, it just seems to resolve on its own. It has started to become incredibly inconvenient as many sites do not allow you to just drop a file in rather than attach by means of an actual button (which is how I’ve been trying to get around this issue).
 
If anyone can help, it would be INCREDIBLY appreciated!!
 
UPDATE: Now Chrome is not allowing me to download anything from the PDF preview witht he button as well.

The issue occurs due to the Local Group Policy settings, which prevent users from uploading content to Portal for ArcGIS using Google Chrome. The Attachment Manager under the Windows component is responsible for this behavior.

Solution or Workaround

To resolve the issue, complete the following steps:

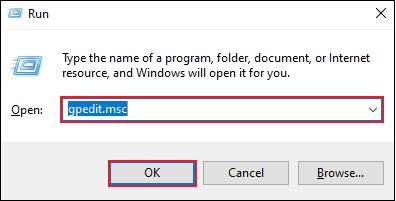
  1. Press the Windows key + R. In the Run window, type gpedit.msc, in the Open section. Press Enter or click OK.
The Run window. Click OK.
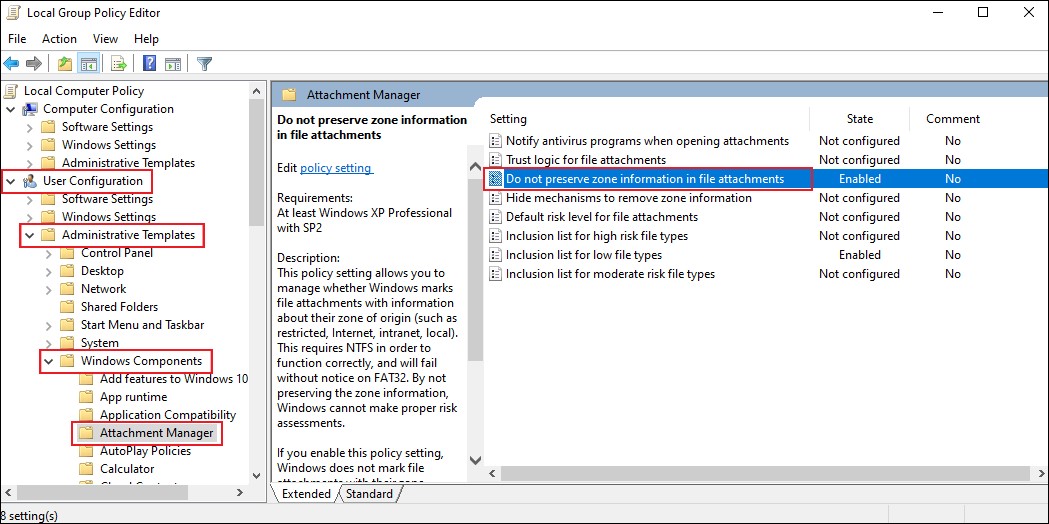
  1. In the Local Group Policy Editor window, on the left pane, navigate to User Configuration > Administrative Templates > Windows Components > Attachment Manager. On the right pane, double-click Do not preserve zone information in file attachments.
The Local Group Policy Editor window displaying the content in the Attachement Manager folder.
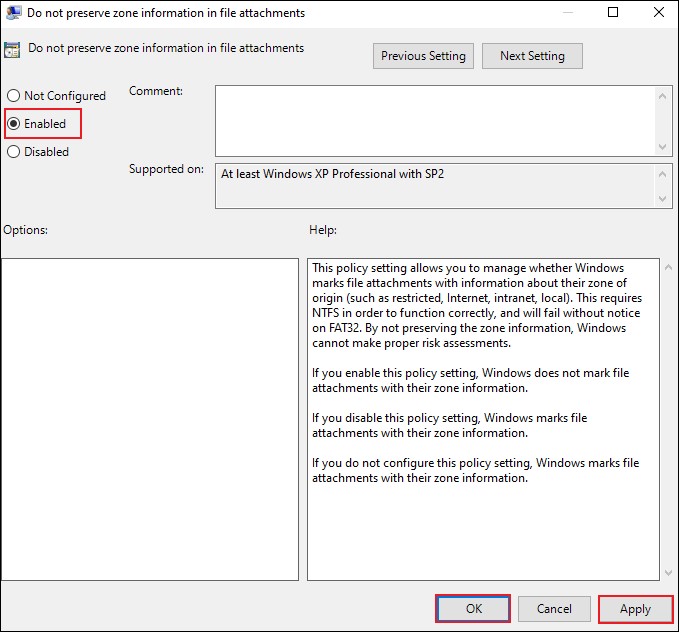
  1. In the Do not preserve zone information in file attachments window, select Enabled. Click Apply and OK.
The Do not preserve zone information in file attachements window displaying the Enabled option.
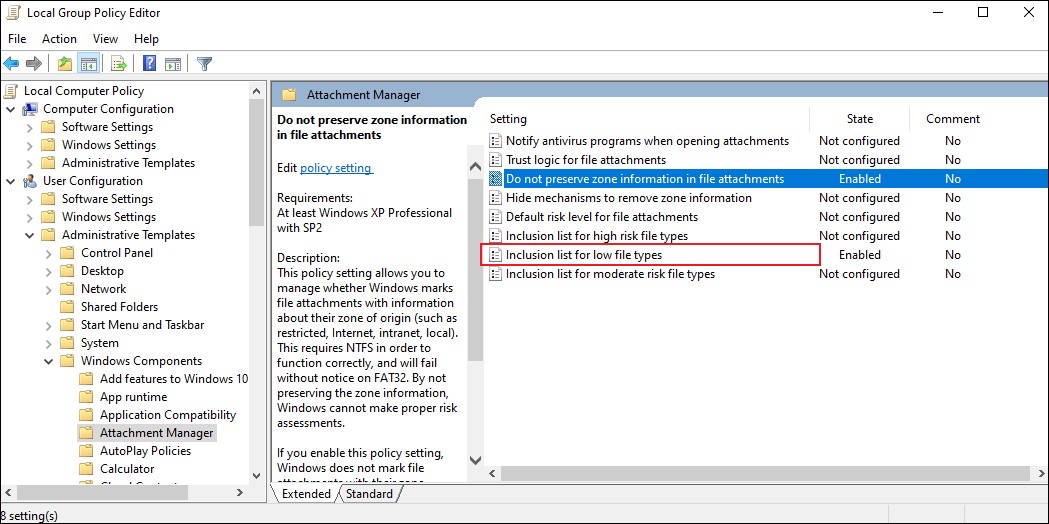
  1. In the Local Group Policy Editor window, double-click Inclusion list for low file types.
The Local Group Policy Editor window displaying the content in the Attachement Manager folder.
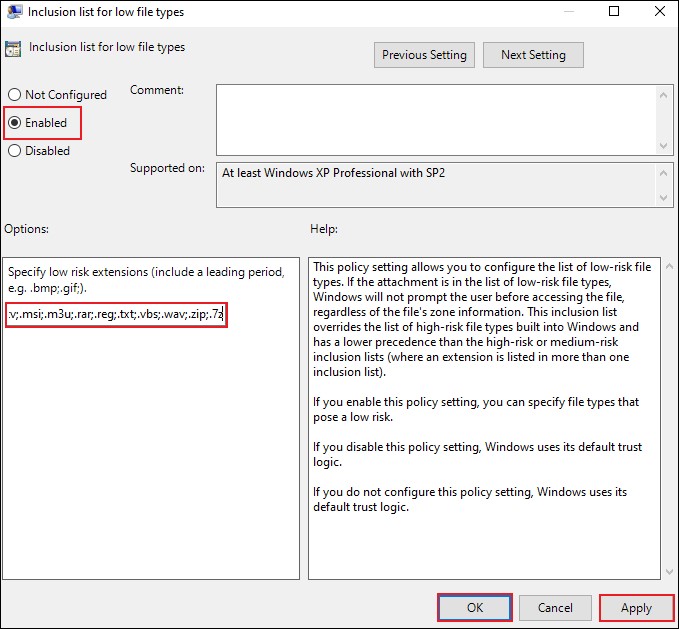
  1. In the Inclusion list for low file types window, select Enabled and paste the following line in the Specify low risk extensions input field:
.avi;.bat;.cmd;.exe;.htm;.html;.lnk;.mpg;.mpeg;.mov;.mp3;.mp4;.mkv;.msi;.m3u;.rar;.reg;.txt;.vbs;.wav;.zip;.7z
  1. In the Inclusion list for low file types window, click Apply and OK to save the changes.
The Inclusion list for low file types window displaying the Enabled option.
  1. Close the Local Group Policy Editor window and restart the computer.

How to fix file upload not working in chrome

If in the process of downloading applications, themes, extensions or other files on Chrome browser, you receive an error message, then you can apply one of the solutions below to fix the error. .

Fix network error or Server error

1. System error
 
If on the screen you see the error message “Network Error”:
 
– Need to make sure that the Internet connection is working properly. Chrome will automatically resume the download.
 
In addition, you can resume the download of files by clicking on the down arrow icon => Resume.
 
– If you still can’t download, then the most likely cause is your unstable Internet connection.
 
– The “Network Error” error is different from the “Network Failed” error – the error appears during the installation of the extension on the Chrome browser.
 
2. Server Error
 
If you see an error message such as “Server Problem” while downloading applications, files,… then you can fix the error by trying to download the file, application,… or contact us. with the site owner.

“Network Failed” error

If the “NETWORK_FAILED” error appears during the installation of an application, extension, or theme on the Web Store Chrome browser on Windows, it is likely that unwanted software is blocking the installation process.
 
To fix this error:
 
– First remove the unwanted software, then try reinstalling the application, extension or theme.
 
– If you still can’t install the application, extension or theme, then you can think of a solution to reinstall the Chrome browser.

Fix Not Responding error

If you use the Chrome browser to browse the web, you are probably familiar with the Not Responding error on the Chrome browser. The cause of the Not Responding error can be due to incompatible hardware errors, driver errors …
 
1. Browser Optimization
Sometimes in some cases, optimizing the browser can fix the Not Responding error on Chrome browser.
Open your Chrome browser, then clear your cache, browsing history, and cookies.
 
– First open your Chrome browser.
 
– Next, click on the 3-line dash icon in the top right corner of the screen and then click More Tools => Clear Browsing Data or press the keyboard shortcut Ctrl + Shift + Del.
 
– On the Clear Browsing Data window you choose options such as password, …
 
– Finally click on Clear Browsing Data.
 
Restart your Chrome browser to check if the error still occurs.
 
2. Clean up Cookies
Whenever you visit a website, it stores a small piece of data called a cookie on your web browser. Cookies are small files that websites place on your computer to store information about you and your preferences.
 
Although cookies do not “take up” a lot of memory space, even if you visit 100 websites a day, it will not affect. However, it is not really necessary to store cookies from the websites you visit. Every KB you add to temporary memory will slow down your operating system.
 
By default Google Chrome allows cookies from all websites. However you can reset this option.
 
Clean Cookies
– Open your Chrome browser.
 
– Then click on the icon of 3 dashes in the top right corner of the screen, then click Settings => Show advanced settings.
 
– Expand the Privacy section and then click Content Settings.
 
– At this time, the Content Settings window will appear on the screen. Here you can change the settings you want and then click All cookies and site data.
 
On the screen will show all cookies and data stored on your browser. Click Remove all => Done and you’re done.
 
3. Close all Non responsive windows
When you open more than one tab on Chrome browser, it is very likely that one or several tabs will be “frozen” and hang. Then you can think about closing the non-responsive tags to fix the error.
 
– To do this, first open Task Manager on Chrome browser by pressing Shift + Esc key combination.
 
– Now on the screen appears a window showing all running processes and extensions.
 
– Select the cards that are frozen or the cards that are suspended and then select End process.
 
4. Disable Extensions
In some cases, the functions of the 3rd party plug-in application can be the cause of the Not Responding error on the Chrome browser. In this case you can disable the 3rd extension and re-enable it and check if the error persists.
 
– Open your Chrome browser.
 
– Then click on the icon of 3 dashes in the top right corner of the screen and then click Tools => Extensions.
 
– Now the screen will display a list of all the extensions (extensions) that you install on your browser.
 
5. Disable Sandbox Mode
The Sandbox Mode feature can be the cause of the Not Responding error on Chrome browser. So you can apply how to disable this feature to fix the error.
 
To disable Sandbox Mode, follow the steps below:
 
Disable Sandbox Mode
 
– Right-click the Google Chrome shortcut on the Desktop.
 
– Select Properties and then navigate to the Shortcut tab.
 
– Add the string “-no-sandbox-” to the end of the Target box as shown below.
 
– Finally click OK.
 
6. Run an anti-virus program
Anti-virus and anti-malware programs can help fix corrupted files on your operating system. With the browser, these programs can do the same thing. Use an anti-virus program to scan and clean up your system. This way about 80% of the problems on your system can be fixed.
Theartcult hopes that this article has helped you. If you have any questions or suggestions on this topic, don’t hesitate to leave us a comment below. Thanks for reading!
 
Visit Macwintips.com to update the most practical and useful tips for Mac and Windows!