How to run Mac Disk Utility First Aid to repair the disk on MacBook. Disk Utility’s First Aid feature can verify the health of a hard drive and, if necessary, repair the hard drive’s data structure to prevent minor problems from turning into big problems. With the advent of OS X El Capitan, Apple made a few changes to the way the First Aid feature in Disk Utility works. The main change is that First Aid no longer has the ability to verify the drive independently of the repair. Now when you run First Aid, Disk Utility will verify the selected drive and if it finds an error, automatically try to fix the problem. Before El Capitan, you could just run the verification process yourself and then decide if you wanted to attempt a repair. Theartcult will share you How to run Mac Disk Utility First Aid to repair the disk.
What is Disk Utility on Mac?
Disk Utility MacBook is an application that comes with your Mac. It’s hidden in the Utilities folder, found inside the Applications folder, but is easy to locate using Spotlight – which you activate by pressing Command + Space Bar. Here are the uses of Disk Utility:
– Disk Utility MacBook is used to erase, format or manage internal disks and external storage devices.
Disk Utility MacBook can also be used to add and manage data or if you want to organize your date into partitions.
– Disk Utility can be useful if you are working with RAID sets. Combining multiple disks into a RAID set that acts as a single disk can increase performance, reliability, and storage capacity.
– You can use Disk Utility to create a disk image of files that you want to move to another computer, store, or back up.
– Disk Utility is used to diagnose and fix problems with damaged disks or drives.
Disk Utility was perfected in Mac OS X El Capitan as it was redesigned and many features developed or removed for better fit.
There are also a few changes in macOS High Sierra thanks to the new file format Apple has introduced: APFS.
Why use Disk Utility on a MacBook?
You may want to use Disk Utility if you experience the following problems:
– Your computer will not boot.
– An external device will not work.
– Your application is exiting unexpectedly.
– You have a corrupted file.
– You need to mount, unmount or eject the disc.
– You need to make changes to the file system – for example to enable or disable logging.
– You think there is a problem with your startup disk.
– You need to repair a damaged disk.
– To erase, format or partition the disk.
– Disk Utility MacBook is used to check and repair permissions but because El Capitan is not needed.
How to check the drive for errors using Disk Utility MacBook
If you think there’s a problem with your Mac’s internal drive or external storage device, you can use the First Aid feature in Disk Utility to check. The First Aid feature in Disk Utility runs various checks and if it detects a problem with your disk and repairs it.
Note: The steps you need to take will depend on the version of MacOS you’re running. We’ll assume you’re running a version newer than El Capitan since the September 2015 release of Mac OS X.
Here’s how to run First Aid on a Mac to check if there’s a problem with your disk:
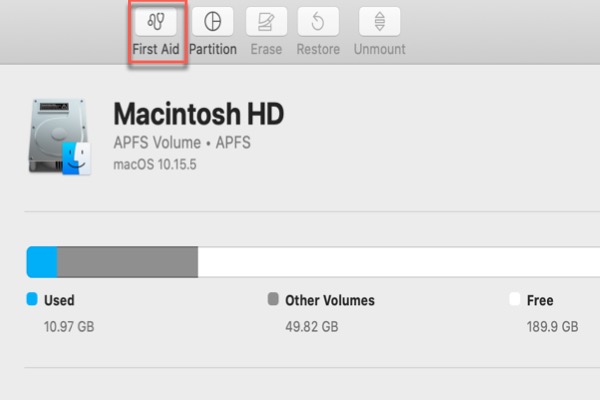
– Open Disk Utility.
– Select your device on which you are having problems with the sidebar.
– Click on First Aid.
– Disk Utility will check the partition map on the disk and check each drive. If you run First Aid with only one drive, Disk Utility will only check the contents of that drive.
If it finds a problem with the disk, Disk Utility will try to fix the problem by itself.
If Disk Utility tells you the disk or drive is about to fail, you should back it up and replace it. Disk Utility won’t be able to repair it.
If Disk Utility reports that the disk is OK it means there is no problem with the disk.
How to repair a disk using Disk Utility
Here’s how to repair an external disk using Disk Utility.
– Open Disk Utility (in Applications > Utilities, or cmd + space Disk Utility).
– Select the volume you want to run First Aid on. This could be an external hard drive (if it’s your own MacBook hard drive, you’ll need to move on to the next section).
– Click on First Aid.
– Click Run. This will start the verification and repair process.
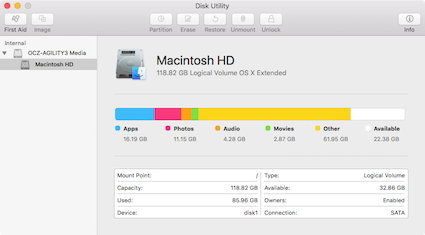
– When Disk Utility has run to check, you will see a table showing the status. You can click the triangle at the bottom to see more information.
– If no errors are found, you will see a green tick at the top of the display panel.
– If there are errors, Disk Utility will try to fix them. (In older versions you had to manually select Repair Disk).
If Disk Utility cannot repair the drive, or it confirms the disk is about to fail, it will warn you. If this is the case you should back up your Mac as soon as possible.
How to fix boot disk/startup disk with Disk Utility MacBook
You can run First Aid on your boot drive the same way as above, but if Disk Utility finds any errors, it will repair them on its own.
If you need to repair your Mac’s boot drive (boot disk/startup disk), you won’t be able to use Disk Utility to repair the mounted drive. In older versions of Disk Utility, you’ll see the Repair Disk option grayed out.
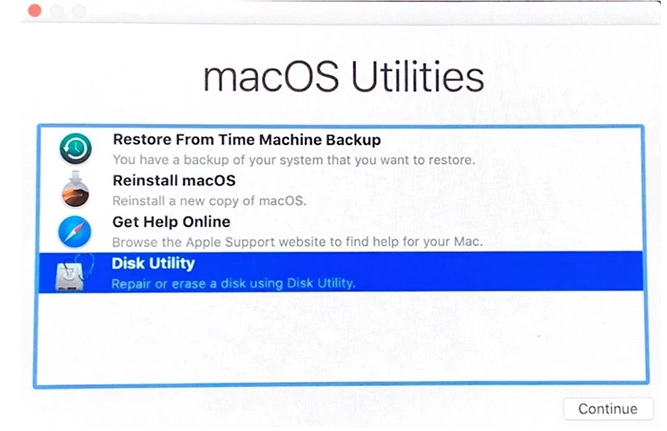
In this case, you need to start your Mac in Recovery Mode and repair the disk from there. This way anything can be run from the Recovery HD volume that was created when installing MacOS.
To start in Recovery Mode, press cmd + R when you start your Mac. We have detailed instructions on how to use Recovery Mode here.
After your Mac boots up, you’ll see the Utilities screen. Select Disk Utility.
– Select the disk you want to repair from the menu and click First Aid. As above, Disk Utility will run a check for problems and will repair if it finds an error.
– The repair process may take a while.
How to authorize the drive on a MacBook
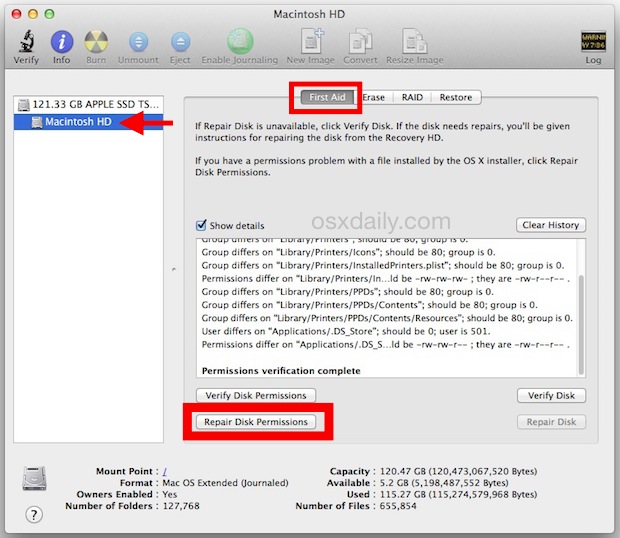
When Apple released El Capitan in 2015, it removed the ability to repair disk permissions. However, it can still fix the Terms of Use Terminal, but we won’t go into that here.
If you’re using MacBook OS X Yosemite or earlier and the file permissions are no longer set correctly, the software that uses the file may not perform at its best. If that happens, here’s how to fix disk permissions:
– Open Applications → Utilities → Disk Utility folder.
– Select the boot disk from the list of drives.
– Click the First Aid tab.
– To check permissions, click Verify Disk Permissions. To repair permissions, click Repair Disk Permissions.
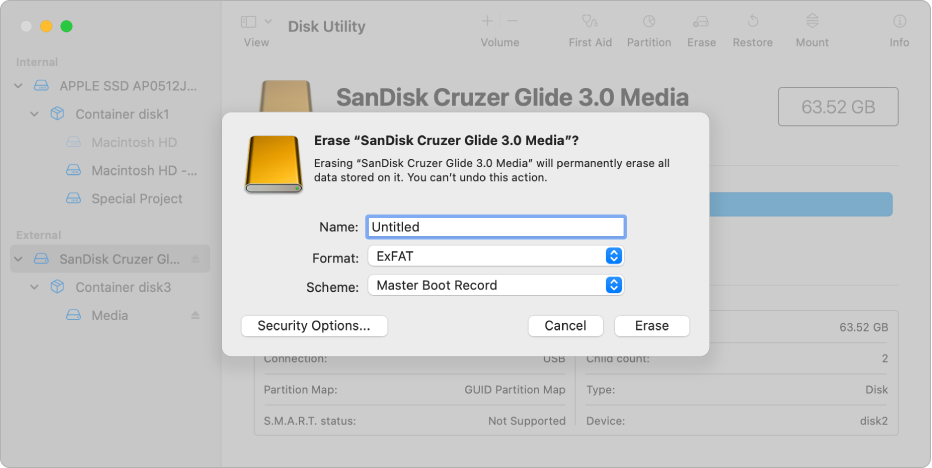
How to format a drive using Disk Utility
There are a number of reasons why you might want to format a drive. Perhaps you want to erase the boot drive so you can install a fresh OS X, maybe you want to encrypt an external storage drive that you use for work, or you can create a partition for Windows or another version of the System. operating MacBook. We have step-by-step instructions for formatting a drive on a Mac here.
Fix problems with external drives
Here’s what to do if you plug a hard drive or flash drive into your Mac and don’t see it, which means you won’t have access to your data: What to do if the hard drive won’t mount.
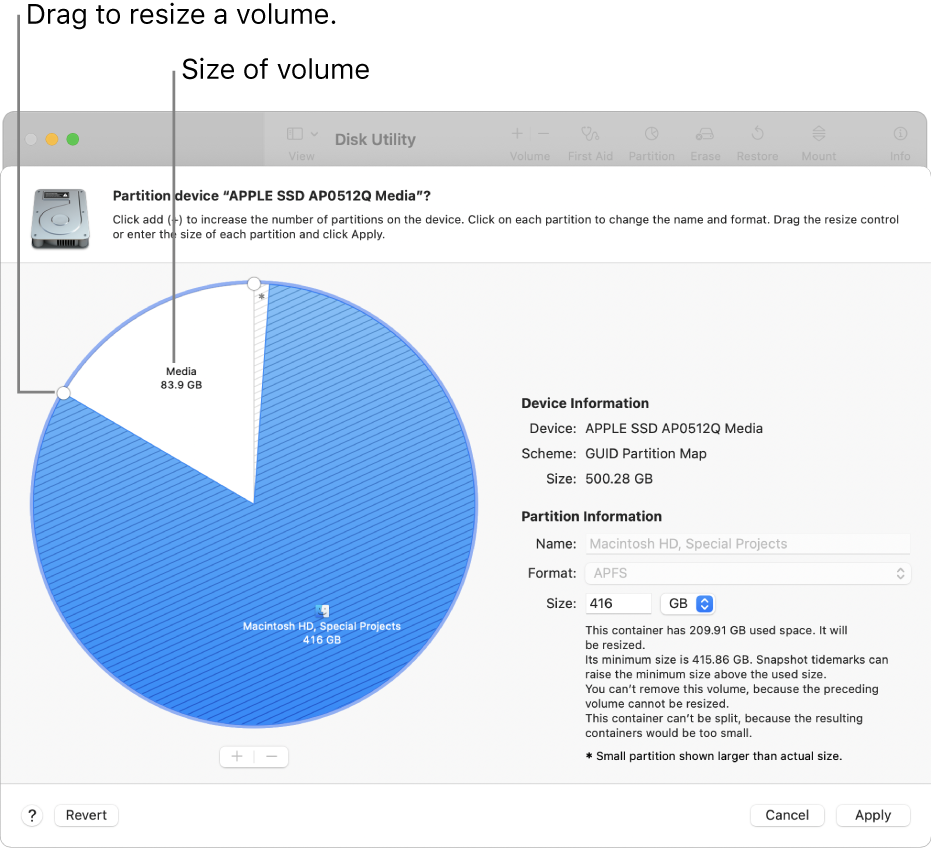
You may want to partition the disk if you want to install multiple operating systems. How you partition your disk will depend on whether you’re running High Sierra or an earlier version of macOS or Mac OS X. More information on how to partition a disk may be helpful to you. We have instructions on how to partition a MacBook here. Also, here’s what to do to fix the Blue Screen of Death on your Mac.
Hopefully, with the useful information shared in this article, MacBook users have learned more about the benefits and usage of Disk Utility on MacBook.
Please visit Macwintips.com to update the most practical and useful tips for Mac and Windows!