Fix Free Transform not working in Photoshop 2022. If you have already tried all solutions like deactivating/reactivating Quick mask, using legacy transform in Preferences, and checking the option ‘Show transform controls’ under the Move tool, but none worked, let’s try our suggestions below and see if it works for you.

Fix Free Transform not working in Photoshop 2022
Press the Delete key then Ctrl + T
Manually removing preferences files
Manually removing preferences files is the most complete method for restoring Photoshop to its default state. This method ensures all preferences and any user presets which may be causing a problem are not loaded.
-
Quit Photoshop.
-
Navigate to Photoshop’s Preferences folder.
macOS: Users/[user name]/Library/Preferences/Adobe Photoshop [version] Settings
Windows: Users/[user name]/AppData/Roaming/Adobe/Adobe Photoshop [version]/Adobe Photoshop [version] Settings
Note:The user Library folder is hidden by default on macOS. To access files in the hidden user Library folder, see How to access hidden user library files.
-
Drag the entire Adobe Photoshop [Version] Settings folder to the desktop or somewhere safe for a back-up of your settings
- Open Photoshop.
New preferences files will be created in their original location.
How to restore the legacy Free Transform behavior
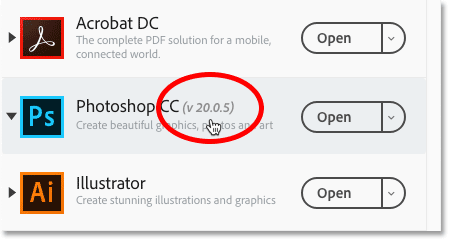
Step 1: Update Photoshop CC
To restore the original Free Transform behavior, the first step is to update your copy of Photoshop CC.
Just open your Adobe Creative Cloud app and select the Apps category at the top. Scroll down to Photoshop CC and look at the version number beside its name. The version number should say 20.0.5 or higher. If it doesn’t, and you see an Update button instead of an Open button, click Update:
Step 2: Open Photoshop’s Preferences
Next, open the Photoshop Preferences. On a Windows PC, go to Edit > Preferences > General. On a Mac, go to Photoshop CC > Preferences > General. Or you can open the Preferences from your keyboard by pressing Ctrl+K (Win) / Command+K (Mac):
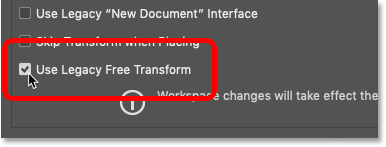
Step 3: Select “Use Legacy Free Transform”
Then in the General category, select the new Use Legacy Free Transform option. Don’t worry about the warning that says the change will take place after you restart Photoshop. The Use Legacy Free Transform option takes effect as soon as you select it. When you’re done, click OK to close the Preferences dialog box:
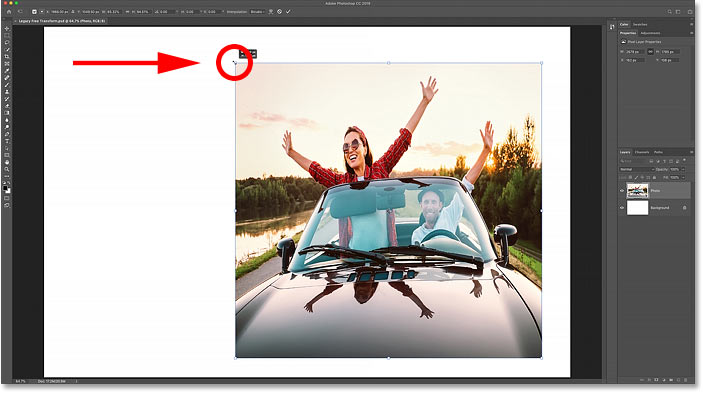
Step 4: Open Free Transform
Select the Free Transform command by going up to the Edit menu and choosing Free Transform, or by pressing Ctrl+T (Win) / Command+T (Mac) on your keyboard:
Step 5: Drag the handles to scale the image
And now when you drag the handles, you’re back to the original Free Transform behavior. Drag any handle to scale the image non-proportionally.
Or press and hold Shift and drag a corner handle to scale the image proportionally. And regardless of which version of Free Transform you’re using, you can always press and hold the Alt (Win) / Option (Mac) key as you drag a handle to scale the image from its center:
Free Transform Control Mode In New And Old Photoshop Version
To use Free Transform in Photoshop, select the object then click Edit on the menu and choose Free Transform or use the keyboard shortcut Command + T on a MacBook Pro or MacBook Air computer. A box with 8 handles will surround the object allowing you to zoom in, out, and distort the object.
In the old version, Apple users had 2 options:
+ Option + Alt + Drag handle: Change the size of the object in place.
+ Shift + Alt + Drag handle : Distort the object.
In the new version of Photoshop, you can simply drag the handle that transforms the object but keeps the old aspect ratio, press Shift to distort everything. This new setup is very simple, but it is difficult for old users. And if you have the same problem, luckily, Adobe still has the option to restore the old Free Transform control mode.
Restore Control Settings Free Transform In Old Photoshop
Step 1: Click on Photoshop then select Preferences .
Step 2: Select General in the left function list and tick the Use Legacy Free Transform option .
Tick Use Legacy Free Transform to restore the old control way
Changes will be changed immediately. Close the settings window and use Free Transform in Photoshop as before.
Alternatively, to display the center point as a reference when opening Free Transform, click the icon in the menu bar. Note, you can tap the icon to change from center center to other positions.
Although Adobe supports restoring the Free Transform control mode in Photoshop, we recommend that you familiarize yourself with the new control. Because most likely Adobe will stop supporting this feature in the future. Good luck!
Theartcult hopes that this article has helped you Fix Free Transform not working in Photoshop 2022. If you have any questions or suggestions on this topic, don’t hesitate to leave us a comment below. Thanks for reading!
Visit Macwintips.com to update the most practical and useful tips for Mac and Windows!