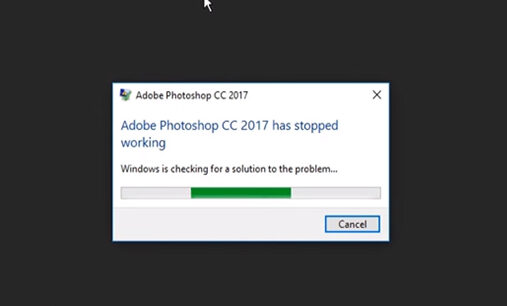
How to fix Photoshop cc 2017 has stopped working Problem on Windows 10. Like all other softwares, one day, our Photoshop goes wrong. When we open the software, a window appears error message Adobe photoshop cc 2017 has stopped working. There are many causes but there is an effective way to fix bugs for Photoshop software.
Recover your lost PSD files
You may lose your working PSD files if Adobe Photoshop CC 2017 crashes unexpectedly. This can be frustrating, especially when you’ve spent hours on your project. Don’t worry because there is still a way to recover your unsaved PSD files. Just follow the steps below:
Navigate to this path:
System Drive (C:) / Users / Your Username / AppData / Roaming / Adobe Photoshop CC / AutoRecover
Make sure all hidden files are revealed. Go to the View tab on File Explorer, then click Options. Select ‘Change folder and search options.’ In the Folder Options window, click the View tab. Select the ‘Show hidden files, folders and drives’ option. Click Apply and OK.
Select the unsaved PSD file and move it to a safe location. After the repair is done in Adobe Photoshop CC 2017, you can try opening the PSD file, then saving it accordingly.
If you think you’ve accidentally deleted the PSD files you’re working on, don’t panic. There is still a way to restore them. You can use Auslogics File Recovery to recover data that you think has been lost.
How to fix Photoshop cc 2017 has stopped working Problem on Windows 10
There are two ways to fix your malfunctioning Adobe Photoshop CC 2017:
First method: Rename the .dll . file
On your keyboard, press Windows key + E. Doing so will open File Explorer.
Navigate to this path:
c://windows/system32
Find the LavasoftTcpService64.dll file.
Right-click it, then choose Rename from the options.
Change the name of the file to oldLavasoftTcpService64.dll.
After renaming the file, try opening Adobe Photoshop CC 2017 again.
Second method: Go to the Spaces folder in Photoshop and put an italic symbol (~) in front of it
Launch File Explorer and open the C: drive.
Navigate to this path:
Program Files -> Adobe -> Adobe Photoshop CC 2017 -> Required -> Plug-ins
Locate the Spaces folder, then rename it. Add a tilde (~) before the name of the directory.
Restart Adobe Photoshop CC 2017, then check if the problem is resolved.
DISCLAIMER Anti-malware images
Protect your PC from threats with Anti-Malware
Check your PC for malware that your antivirus program might miss and safely remove threats with Auslogics Anti-Malware
Microsoft Partner Logo
Auslogics Anti-Malware is a product of Auslogics, certified by Microsoft® Silver Application Developer
DOWNLOAD NOW
There are several reasons why your Adobe Photoshop CC 2017 crashes. It is possible that malware has found its way to your PC, affecting your applications and system files. So, to protect your computer and prevent the error from happening again, we recommend using Auslogics Anti-Malware. This tool will check your system memory and look for malicious programs running inconspicuously. It will catch threats and attacks that can affect your security and files.
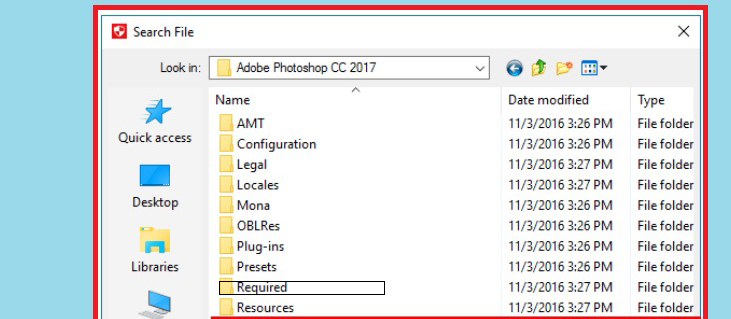
Step 1
You go to the path C: \ Program Files \ Adobe \ Adobe Photoshop CC 2017 \ Required as shown below
Step 2
Next, navigate to C: \ Program Files \ Adobe \ Adobe Photoshop CC 2017 \ Required \ Plug-Ins and you will see a folder named Spaces in that path.
Step 3
You Rename (Rename the folder) the Spaces folder to ~ Spaces as shown below
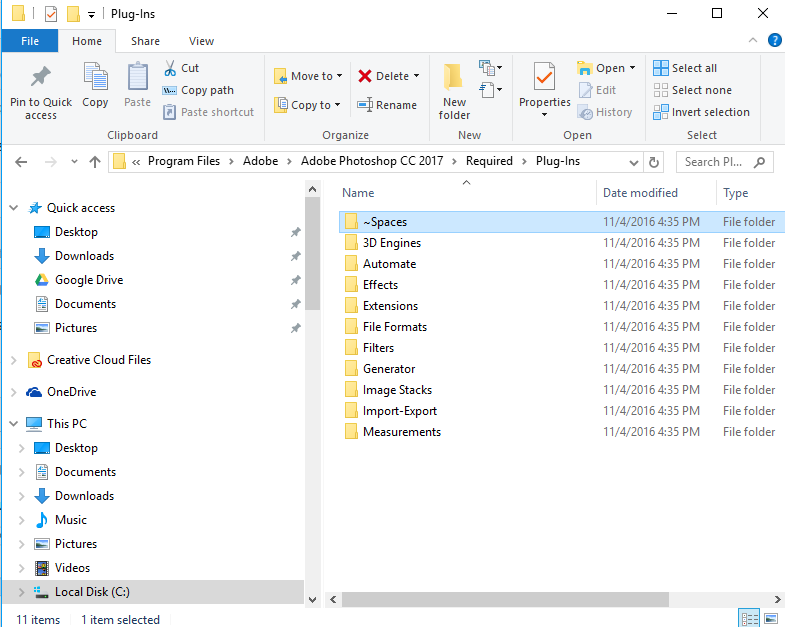
When the ~ Spaces folder is on top as shown above, it’ll be working.
I wish you to Fix Photoshop cc 2017 has stopped working successfully!